Godot Python MMO Part 1
Hello and welcome to my first entry in what will probably be a five-part blog and accompanying video series on how to set up a fully functional game server using Python. With the help of Godot, clients will be able to connect from any device.
The first half of this post is focused purely on setting up the framework upon which the rest of our game features will be built. It assumes you are quite comfortable with Python and GDScript. Anyone less than comfortable is still encouraged to read up to and including the tip for the lazy section for instructions to get the bare minimum setup and skip to the less scary part.
If you prefer, you can view this lesson on YouTube. The YouTube video is a different experience, and does contain slightly more explanation for each line of code. If you are not 100% comfortable with Python or Godot, the best way to follow this lesson is to watch the YouTube video, and use this blog as a reference.
Overview of the architecture
We will be using the following technologies:
- Autobahn Twisted for Python to run the server code
- Django for Python to talk to the SQLite 3 database
- Godot game engine to run the front end, and export to desktop, mobile, or web
I chose Autobahn Twisted because it supports the WebSocket protocol, which is what we need to use if we are to export the game for the web.
Django and Python work quite well together for managing game databases, and Python is already installed on most servers.
Godot is a very light-weight, open source, and free game engine which has a Pythonic scripting language, and good networking library. It really shines with its free export features which allow you to make your game once, and export it for Android, IOS, HTML5, Windows, Mac, or Linux.
Short term and long term goals
Our short term goal for the first two parts of this series is to have a working chatroom, where you can register, log in, and chat to anyone who is online.
The rest of the series will be focused on adding some very simple (but easily extendable) game functionality to our “chatroom”.
Setting up the server
Without further ado, let’s begin setting up the back end! For this, we will need some prerequisites:
- Ensure you have Python 3.8 or above installed on your device.
- Download and install Visual Studio Code (if you don’t have it already).
- Create a new folder somewhere on your device. This is where we will store all of our game code.
- Create a subfolder and name it
server.
The virtual environment
We are going to set up a virtual environment to make it easier to manage all our dependencies. To do this, the instructions are slightly different for Windows users so read carefully.
Open a terminal (if you are using Windows, make sure it is PowerShell and not CMD) in the server folder and run the following commands (note you may need to use python3 rather than python especially if you are running a Unix-based OS):
python -m venv ./venv
If you are using Windows, the next command will be
./venv/Scripts/activate
For everyone else, this is
source ./venv/bin/activate
If done properly, you will see your terminal has a green (venv) prompt. Now you are free to install all the dependencies with the following commands one at a time (if you are using a Unix-based OS, you may need to type pip3 instead of pip):
pip install autobahn[twisted]
pip install Django
Note if you are using Mac (or Linux with zsh), the first one probably won’t work due to the square brackets. In that case, try escaping the square brackets like this
pip install autobahn\[twisted\]
That’s it for the dependencies! Let’s start getting our hands dirty by writing some real code now.
Open your server folder with Visual Studio Code. You will want to install the Python extensions if you don’t have them already. I highly recommend this one.
You will want to tell VS Code where your virtual environment is too, so it doesn’t complain when you try to import things that aren’t in your base Python install. To do this, click the button at the very lower-left corner of your VS Code window which says the Python version (Python 3.x.x). Then you will see a dropdown appear in the top-middle of the Window. Click Enter interpreter path > Find and navigate to your server/venv/ folder. Inside this folder, navigate to Scripts/ (Windows) or bin/ (Unix-based) and select python. Finally, click Select Interpreter. You should now see in the lower-left, it says (‘venv’: venv).
Tip for the lazy
At this point, if you don’t want to go through all the code, visit the Releases section of the official GitHub repository. Here you will see all valid states of the project which correspond to different points along this tutorial series. For example, if you want to skip all the initial setup work and want to get your hands dirty straight away, download the Initial template code by expanding Assets and downloading Source code (zip).
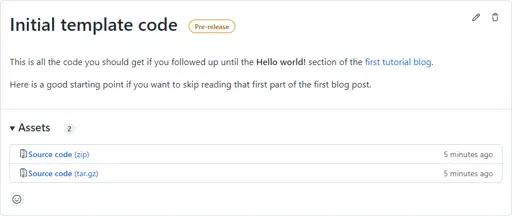
You’ll have to unzip the official-godot-python-mmo-0.0.zip file, copy the client and server folders, and paste them into your project directory (your existing server/venv folder should be kept). If you chose to do this, you can skip right to the Hello world! section.
Packets!
Create a new file inside your server folder called packet.py.
import json
import enum


class Action(enum.Enum):
    pass


class Packet:
    def __init__(self, action: Action, *payloads):
        self.action: Action = action
        self.payloads: tuple = payloads

    def __str__(self) -> str:
        serialize_dict = {'a': self.action.name}
        for i in range(len(self.payloads)):
            serialize_dict[f'p{i}'] = self.payloads[i]
        data = json.dumps(serialize_dict, separators=(',', ':'))
        return data

    def __bytes__(self) -> bytes:
        return str(self).encode('utf-8')


def from_json(json_str: str) -> Packet:
    obj_dict = json.loads(json_str)

    action = None
    payloads = []
    for key, value in obj_dict.items():
        if key == 'a':
            action = value

        elif key[0] == 'p':
            index = int(key[1:])
            payloads.insert(index, value)

    # Use reflection to construct the specific packet type we're looking for
    class_name = action + "Packet"
    try:
        constructor: type = globals()[class_name]
        return constructor(*payloads)
    except KeyError as e:
        print(
            f"{class_name} is not a valid packet name. Stacktrace: {e}")
    except TypeError:
        print(
            f"{class_name} can't handle arguments {tuple(payloads)}.")
This file simply provides a way to construct and deconstruct packets (information sent between a client and server).

The structure of packets sent over the network in our MMO.
I know you’re probably thinking this looks like a lot. It is! I want to start with a very robust and extensible system, so it’s a breeze to add new packets later.
Our packets contain the following:
- An Action, which is a semantic way of saying “I want this packet to be interpreted this way”!
- Payloads, which is a list of additional information associated with the packet.
Here is a rundown of the above code, but you don’t have to read it if you don’t want to:
- We started by defining a
Actionenum which is a nice place to store all the possible actions our packets can have. Currently, we don’t have any actions yet because we haven’t actually started writing our game yet! - Next we defined the base
Packetclass. The constructor accepts an action and payloads. It includes a__str__override for logging reasons, but also for sending it over the network. Note the__bytes__override uses the__str__override and encodes the result asutf-8. These overrides are useful for when we finally need to send our packets over the internet. - The
from_jsonfunction accepts a string and constructs it into a packet. It is the exact inverse of thePacket.__str__function. It is able to reconstruct the original packet subclass by using reflection, but this only works if the subclasses are named according to ourActionPacketrule.
The protocol
Create a new file inside your server/ folder called protocol.py.
import queue
import packet
from autobahn.twisted.websocket import WebSocketServerProtocol


class GameServerProtocol(WebSocketServerProtocol):
    def __init__(self):
        super().__init__()
        self._packet_queue: queue.Queue[tuple['GameServerProtocol', packet.Packet]] = queue.Queue()
        self._state: callable = None
        self._state = self.PLAY

    def PLAY(self, sender: 'GameServerProtocol', p: packet.Packet):
        pass

    def tick(self):
        # Process the next packet in the queue
        if not self._packet_queue.empty():
            s, p = self._packet_queue.get()
            self._state(s, p)

    def broadcast(self, p: packet.Packet, exclude_self: bool = False):
        for other in self.factory.players:
            if other == self and exclude_self:
                continue
            other.onPacket(self, p)

    # Override
    def onConnect(self, request):
        print(f"Client connecting: {request.peer}")

    # Override
    def onOpen(self):
        print(f"Websocket connection open.")

    # Override
    def onClose(self, wasClean, code, reason):
        self.factory.players.remove(self)
        print(f"Websocket connection closed{' unexpectedly' if not wasClean else ' cleanly'} with code {code}: {reason}")

    # Override
    def onMessage(self, payload, isBinary):
        decoded_payload = payload.decode('utf-8')

        try:
            p: packet.Packet = packet.from_json(decoded_payload)
        except Exception as e:
            print(f"Could not load message as packet: {e}. Message was: {payload.decode('utf8')}")

        self.onPacket(self, p)

    def onPacket(self, sender: 'GameServerProtocol', p: packet.Packet):
        self._packet_queue.put((sender, p))
        print(f"Queued packet: {p}")

    def send_client(self, p: packet.Packet):
        b = bytes(p)
        self.sendMessage(b)
This again is a lot, but all for good reason! I just want to re-iterate, the initial boilerplate is designed to be written once, and easily extended.
This file makes use of Autobahn Twisted’s WebSocketServerProtocol class, and is responsible for giving each player a means to access the server. Our goal is for when player 1 opens up the game, their client will contact the server and create a new protocol. This protocol is an instance of the GameServerProtocol class, and is responsible for evaluating messages from the client, sending messages back to the client, and sending messages to other protocols (where they can evaluate that message however they want).
If I’m a game client, I like to think of a protocol as my buddy who lives in another city. We can call each other and discuss what our plans are, and he can talk to his friends in his city if he wants to pass a message along for me. Some of his friends might call their buddies (other game clients) and pass along my message.
Note the PLAY function acts as a state our protocol can be in. At the moment, this is the only state, so we are always in the PLAY state, but soon there will be others. We will fill this function, and other state functions, out ourselves once we start making the game logic.
You don’t need to worry about any of the other functions for now. A lot of them are overrides of the parent WebSocketServerProtocol function, but all help let us focus on our state functions like PLAY. Functions in this file will load data up for us by adding a sender-packet pair into a queue each time data is received. Then, each tick, the protocol calls our state function with the first sender-packet pair from the queue, ready for processing.
Putting it all together
We need a central authority to create all our protocols and let them handle their clients. We call this a protocol factory, and is the main entry point for our server program. To finish up our server boilerplate, create __main__.py in the server folder. Your project structure should look like this now:
server/venv/__main__.pypacket.pyprotocol.py
Inside __main__.py, paste the following code:
import sys
import protocol
from twisted.python import log
from twisted.internet import reactor, task
from autobahn.twisted.websocket import WebSocketServerFactory


class GameFactory(WebSocketServerFactory):
    def __init__(self, hostname: str, port: int):
        self.protocol = protocol.GameServerProtocol
        super().__init__(f"ws://{hostname}:{port}")

        self.players: set[protocol.GameServerProtocol] = set()

        tickloop = task.LoopingCall(self.tick)
        tickloop.start(1 / 20)  # 20 times per second

    def tick(self):
        for p in self.players:
            p.tick()

    # Override
    def buildProtocol(self, addr):
        p = super().buildProtocol(addr)
        self.players.add(p)
        return p


if __name__ == '__main__':
    log.startLogging(sys.stdout)

    PORT: int = 8081
    factory = GameFactory('0.0.0.0', PORT)

    reactor.listenTCP(PORT, factory)
    reactor.run()
The key thing to note about this file is we first define our GameFactory class, which is a subclass of Autobahn Twisted’s WebSocketServerFactory. I want to tell this factory that its job is to build game server protocol instances, so I set self.protocol accordingly in the constructor.
I also wanted all protocols to process packets from their queue 20 times per second, so I create a looping call to fire the tick function every twentieth of a second (which, in turn, tells all protocols to fire their own tick function and process all their packets).
Finally, you can see the official entry point at the end of the file. We are using 8081 as the port, but you can use any other suitable number you like (try to avoid common port numbers that people’s computers are likely to be using). Finally, we are instancing the factory, telling it to listen to all addresses over our port, and we tell it to start running!
That was a lot to get through, and now we have to get the infrastructure set up on the client side now too! Don’t worry, I promise once everything is set up, it will be worth it!
Setting up the client
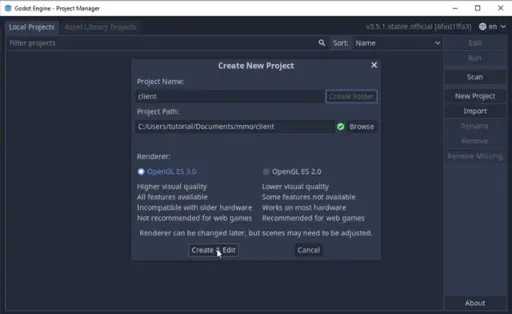
For a nice change of pace, let’s open up Godot! You will be met with the Project Manager. Just click New Project and enter client for the Project Name, and the path to your project folder. Click on Create Folder and it will create a folder called client, and it should be sitting right next to your server folder in your main project folder. If that all sounds good to you, click Create & Edit.
Packets (again)!
To get some of the more boring boilerplate set up as quickly as possible, right-click your res:// folder in the FileSystem (lower-left) and click New Script. Set the path to res://packet.gd and click Create.
In this packet.gd script, replace the pre-generated code with the following:
extends Object

var action: String
var payloads: Array


func _init(_action: String, _payloads: Array):
    action = _action
    payloads = _payloads


func tostring() -> String:
    var serlialize_dict: Dictionary = {"a": action}
    for i in range(len(payloads)):
        serlialize_dict["p%d" % i] = payloads[i]
    var data: String = JSON.print(serlialize_dict)
    return data


static func json_to_action_payloads(json_str: String) -> Array:
    var action: String
    var payloads: Array = []
    var obj_dict: Dictionary = JSON.parse(json_str).result

    for key in obj_dict.keys():
        var value = obj_dict[key]
        if key == "a":
            action = value
        elif key[0] == "p":
            var index: int = key.split_floats("p", true)[1]
            payloads.insert(index, value)

    return [action, payloads]
When you save this script, it will give you a warning that there is no root node, but you can safely ignore that message for now.
This script is essentially the same as server/packet.py. It provides a class for a packet object with an action and payloads. It also provides functionality to convert itself to a string (for sending), and there is also a static function to convert a string to a packet object.
Some scary networking code
Moving on, create another script in res://websockets_client.gd with the following content:
extends Node

const Packet := preload("res://packet.gd")

signal connected
signal data
signal disconnected
signal error

# Our WebSocketClient instance
var _client = WebSocketClient.new()


func _ready():
    _client.connect("connection_closed", self, "_closed")
    _client.connect("connection_error", self, "_closed")
    _client.connect("connection_established", self, "_connected")
    _client.connect("data_received", self, "_on_data")


func connect_to_server(hostname: String, port: int) -> void:
    # Connects to the server or emits an error signal.
    # If connected, emits a connect signal.
    var websocket_url = "ws://%s:%d" % [hostname, port]
    var err = _client.connect_to_url(websocket_url)
    if err:
        print("Unable to connect")
        set_process(false)
        emit_signal("error")


func send_packet(packet: Packet) -> void:
    # Sends a packet to the server
    _send_string(packet.tostring())


func _closed(was_clean = false):
    print("Closed, clean: ", was_clean)
    set_process(false)
    emit_signal("disconnected", was_clean)


func _connected(proto = ""):
    print("Connected with protocol: ", proto)
    emit_signal("connected")


func _on_data():
    var data: String = _client.get_peer(1).get_packet().get_string_from_utf8()
    print("Got data from server: ", data)
    emit_signal("data", data)


func _process(delta):
    _client.poll()


func _send_string(string: String) -> void:
    _client.get_peer(1).put_packet(string.to_utf8())
    print("Sent string ", string)
This file provides an API for connecting to a server and sending it packets. The details are a bit gritty, but luckily we don’t have to worry about it when we are actually coding our game!
Wrapping it all up
Inside the 2D editor (you may need to click the 2D button at the top) create a 2D Scene Root Node, right-click your new Node2D node, and click Rename and call it Main.
Next, right-click on your Main node again, and this time click Attach Script. If you renamed the node before, your new script’s path should be res://Main.gd. Now click Create.
Your project folder should now look like this (among some other files created by pip, Python and Godot):
server/venv/__main__.pypacket.pyprotocol.py
client/Main.gdpacket.gdwebsockets_client.gd
Open up your new res://Main.gd script, clear out the pre-generated code, and replace it with the following:
extends Node

# Imports
const NetworkClient := preload("res://websockets_client.gd")
const Packet := preload("res://packet.gd")

onready var _network_client = NetworkClient.new()
var state: FuncRef


func _ready():
    _network_client.connect("connected", self, "_handle_client_connected")
    _network_client.connect("disconnected", self, "_handle_client_disconnected")
    _network_client.connect("error", self, "_handle_network_error")
    _network_client.connect("data", self, "_handle_network_data")
    add_child(_network_client)
    _network_client.connect_to_server("127.0.0.1", 8081)

    state = funcref(self, "PLAY")


func PLAY(p):
    pass


func _handle_client_connected():
    print("Client connected to server!")


func _handle_client_disconnected(was_clean: bool):
    OS.alert("Disconnected %s" % ["cleanly" if was_clean else "unexpectedly"])
    get_tree().quit()


func _handle_network_data(data: String):
    print("Received server data: ", data)
    var action_payloads: Array = Packet.json_to_action_payloads(data)
    var p: Packet = Packet.new(action_payloads[0], action_payloads[1])
    # Pass the packet to our current state
    state.call_func(p)


func _handle_network_error():
    OS.alert("There was an error")
When you save this code, you will be asked to “Save Scene As”. Just click Save here to save your scene as Main.tscn.
Note that, if you chose to change your port number in the Putting it all together section, you will need to use that same port number in this script too.
This file is kind of analogous to server/protocol.py in that is contains most of the logic and our state machine. Notice we have a state function called PLAY that doesn’t contain anything yet, we will fill this out soon.
Aside from that, our client/main.gd script simply contains functions for receiving network data and passing it on to our state function.
Now we are finally ready to start creating a simple chatroom!
A quick test
Now is probably a good idea to test our server and client to make sure there’s nothing wrong.
If you didn’t save before, try saving your Godot project now, and you will be asked to “Save Scene As”. Just click Save here to save your scene as Main.tscn.
Open up your terminal again and ensure you still have the green (venv) prompt showing. If not, or if you closed your terminal, just open a new terminal in the server/ folder, and run ./venv/bin/activate (source ./venv/Scripts/activate on Windows PowerShell).
Now run the following command (again, you may need to use python3 if you are running a Unix-based OS):
python .
You should see something like the following if all worked correctly, indicating you have started up the game server!
2022-11-20 13:53:34+1000 [-] Log opened.
2022-11-20 13:53:34+1000 [-] GameFactory starting on 8081
2022-11-20 13:53:34+1000 [-] Starting factory <__main__.GameFactory object at 0x000002235959BC40>
If you see an error here, I would double-check all the files are copy and pasted exactly as how I presented them above. I would also double-check you are in the server folder and ran the Virtual Environment properly.
Now go back to Godot and click the play button at the top right. It will ask you to set a main scene, so just click Select Current. Your game window should pop up, and you will be met with a blank grey screen if you got no errors. Now check the Output panel in the Godot editor again, and you should see the following output:
Connected with protocol:
Client connected to server!
If you check your terminal window now, you should see a new log on the server too, looking something like this:
2022-11-20 13:56:18+1000 [-] Client connecting: tcp4:127.0.0.1:53497
If you got all the above, give yourself a pat on the back! You have a working game client and server which we will be able to easily build upon in the next section! If you got errors, or didn’t see some of the expected output, I would recommend checking the Debugger tab of the bottom panel in Godot’s editor for clues.
Hello world!
Finally we can begin coding ourselves. We will follow the basic steps, which are very similar to steps we will always follow whenever we add a new feature:
- Design and implement a new packet to store our chat information
- Create a Chatbox scene to hold our UI elements and logic for the chatbox, and instance that into the Main scene.
- Modify our
res://Main.gdscript to send chat packets to the server. - Modify our
server/protocol.pyscript to handle the receiving and broadcasting of these chat packets.
Let’s get started!
New packet design
Here we will be creating a new action type, and a new subclass of our base Packet class. Remember here the rule is to call your subclass ActionPacket where Action is the name of your action.
So open server/packet.py and replace the empty Action enum with the following
class Action(enum.Enum):
    Chat = enum.auto()
So we are saying we have exactly one Action at the moment, called Chat. The enum.auto() is just an easy way to keep assigning values to our new actions.
Now let’s add a new class underneath our Packet base class:
class ChatPacket(Packet):
    def __init__(self, message: str):
        super().__init__(Action.Chat, message)
Here we are saying the ChatPacket inherits from Packet, but additionally takes a message string parameter. This gets passed up to the base class as the payload, and we also ensure we tell the base class the action is of type Action.Chat.
This is all we need to do in terms of creating our new packet! Let’s move on, back to Godot!
Creating the Chatbox scene in Godot
We need a new scene in Godot to store all the UI elements for our chatbox. This makes it easy to instance it in our main scene later.
In the Godot editor, right-click the res:// folder in the FileSystem tab (bottom left) and select New Scene. Call the new scene Chatbox and click OK.
Ensure you are in the 2D view (button at the top-middle of the editor) and click User Interface under Create Root Node. Right-click on the new Control node and rename it to Chatbox.
Now right-click the Chatbox node, and create the following new nested children nodes (leave their names default) so your scene tree looks like this:
- Chatbox
- CanvasLayer
- VBoxContainer
- RichTextLabel
- HBoxContainer
- Label
- LineEdit
- VBoxContainer
- CanvasLayer
You’ll notice everything is just clumped together in the scene, so let’s make the RichTextLabel occupy the bottom third of the screen (this will be the chat log) and the Label and LineEdit nodes will run along the bottom.
Click on the LineEdit node to select it, and then expand the Size Flags menu on the right-hand side Inspector. Check Expand under Horizontal.
Now repeat the same process to tell the RichTextLabel node to expand horizontally too. This time also check the Expand box under Vertical to ensure the chat log takes up space vertically too.
With the RichTextLabel still selected, also check Scroll Active and Scroll Following closer to the top of the Inspector’s properties. This will ensure the chat log automatically scrolls as it fills up.
Now click on the VBoxContainer node to select it, and then expand the Anchor menu on the right-hand side Inspector. Enter the following values:
| Left | 0 |
| Top | 0.67 |
| Right | 1 |
| Bottom | 1 |
Ensure the Margin properties are all set to 0.
If you like, you can select the Label node and type a prompt into the Text property in the Inspector on the right. I chose [SAY]:.
You’ll notice everything looks about right now, so save the scene.
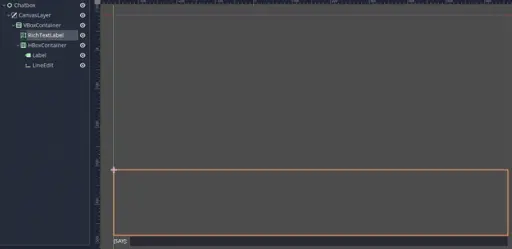
The Chatbox scene should take up the bottom third of the screen as indicated by the faint blue line.
Let’s attach a new script to our root Chatbox node to add some functionality. Right-click the root node and select Attach Script, leave the path as default (res://Chatbox.gd) and click Create. Clear out all the pre-generated code and replace it with the following:
extends Control

onready var chat_log = get_node("CanvasLayer/VBoxContainer/RichTextLabel")
onready var input_label = get_node("CanvasLayer/VBoxContainer/HBoxContainer/Label")
onready var input_field = get_node("CanvasLayer/VBoxContainer/HBoxContainer/LineEdit")

signal message_sent(message)


func _ready():
    input_field.connect("text_entered", self, "text_entered")


func _input(event: InputEvent):
    if event is InputEventKey and event.pressed:
        match event.scancode:
            KEY_ENTER:
                input_field.grab_focus()
            KEY_ESCAPE:
                input_field.release_focus()


func add_message(text: String):
    chat_log.bbcode_text += text + "\n"


func text_entered(text: String):
    if len(text) > 0:
        input_field.text = ""

        emit_signal("message_sent", text)
This code simply adds support for pressing enter or escape on the keyboard to focus in or out of the chatbox. It also provides a function for adding a new message to the log and a signal to emit signifying a new message has been sent off.
Now that we’re done with the Chatbox scene, save it and double-click on Main.tscn in your FileSystem in the bottom-left to go back to the main scene.
While we’re in the main scene, click and drag the new Chatbox.tscn scene from the FileSystem and drop it just under the root Main node in the Scene tree of the Main scene. Your scene tree should now look like this:
- Main
- Chatbox
If you run the game at this point, you should see the chatbox in the main scene, and be able to press enter and escape to change the focus. You can also type something and press enter to “send” it, but nothing will happen. Let’s change that.
Sending packets
We need to be able to tell the server when we’ve sent something in the chat. In Godot, open the Main.gd script and add a reference to the Chatbox node just between the _network_client and state declarations:
onready var _chatbox = get_node("Chatbox")
Now in the _ready function, connect the chatbox’s message_sent signal to a new function (we haven’t created yet) called send_chat:
_chatbox.connect("message_sent", self, "send_chat")
Let’s now define that function:
func send_chat(text: String):
    var p: Packet = Packet.new("Chat", [text])
    _network_client.send_packet(p)
    _chatbox.add_message(text)
And that’s it on the sending front!
Processing packets
Let’s change things up a bit and revisit our server/protocol.py file. We want to tell the server what to do when it encounters a Chat packet.
In protocol.py, fill the following for the currently empty PLAY function:
def PLAY(self, sender: 'GameServerProtocol', p: packet.Packet):
    if p.action == packet.Action.Chat:
        if sender == self:
            self.broadcast(p, exclude_self=True)
        else:
            self.send_client(p)
Here we are telling the protocol to broadcast your message if it came from your client. The exclude_self flag ensures the protocol won’t send the same message back to its own client.
If the packet didn’t come from the protocol’s own client, then it came from some other client’s protocol, and we need to tell our client about it. In this case, the else clause takes care of it.
Note the first if statement is checking the packet’s action. This ensures we won’t accidentally interpret some other packet as a chat packet, and it also is a nice way to ensure we are only processing allowed packet types depending on which state we are in. Later on, we will have different states that won’t need chat packets, so we won’t need to check for them there!
Now we just need to tell the client how to receive and process new messages and we’re done!
Open Godot again, and open our favourite script, res://Main.gd. Let’s replace the rather sad looking PLAY function with the following:
func PLAY(p):
    match p.action:
        "Chat":
            var message: String = p.payloads[0]
            _chatbox.add_message(message)
This is quite similar to the PLAY function in server/protocol.py. Godot’s match keyword works like a switch statement in other languages, or an if-elif chain in Python. Basically we are telling Godot, “while we’re in the PLAY state, if we get a Chat packet, then add it to the chat log”. Pretty simple.
That’s it! We have successfully implemented a chat feature into our game. Don’t worry, we will be keeping this for our game once we continue to add features, although we will be modifying it slightly down the track.
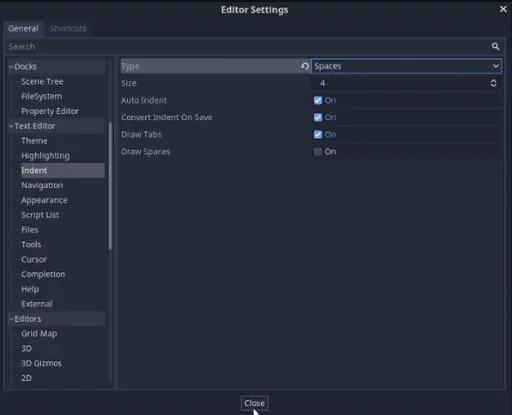
*Note: if you get an error in Godot saying Mixed tabs and spaces in indentation, you can fix this by clicking the Editor menu at the top, then click Editor Settings. Scroll down and select Text Editor > Indent on the left. Then change the Type to Spaces and click Close.
Let’s chat!
Let’s test our new chatroom. If your server is still running from the last test, simply open the terminal and press CTRL+C to interrupt the program. Then simply re-run python . (if you’re in the server directory and have the Virtual Environment loaded). See the A quick test section for a reminder on how to do this.
Once the server’s running, click the play button in the top-right of the Godot editor to test our the client.
You will be able to enter a message into the chatbox and see it printed to the log. But that’s not much proof our chatroom is really working. In order to convince ourselves, we will need to run another client simultaneously and let them talk to each other.
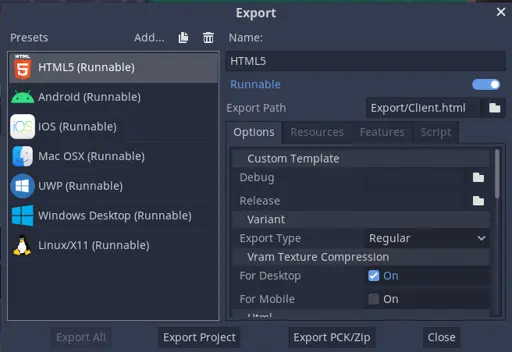
It’s not actually possible to click the same play button we’ve been using twice. I found the easiest way to run multiple instances of our game is actually to export to HTML5, and then you will have access to another button at the top-right where you can launch an instance of your game from a web browser.
To do this, just click Project at the top and then Export. In the Export window, click Add and the HTML5.
You will need to download an export template, so click Manage Export Templates at the bottom of the Export window.

On the next window, leave Best available mirror selected and click Download and Install. This may take some time, as the template files are about half a gigabyte, so you might want to make a cup of coffee in the meantime ☕
Once the HTML5 template is installed, you can come back to the Export window with the HTML5 (Runnable) preset selected, leave all settings default and click Export Project, create a new folder called HTML5 (or anything you like really) and click Save.
Then you can close the Export window and you’ll see a new button at the top-right which will run the exported HTML5 project in your browser.
You can click this new HTML5 button as many times as you want to keep opening new browser tabs. You can do this while the Desktop version of your game is running too, so you can get a really good test of the chatbox.
You should be able to type something and see it appear in the other clients’ chat logs. How exciting! If you don’t see this, I would recommend checking the terminal for Python errors, checking the Godot Debugger for Godot errors, and generally checking all the code was copy and pasted correctly.
Conclusion
Well that’s it. It was a very long journey to achieve what doesn’t look like much, but I want you to keep in mind: this is a very over-engineered chatroom. The surrounding architecture allows for very easy customisation and new features. This is the foundation for which we will build the rest of the project, so it’s important we get it right!
With that said, I’ll see you in the next part where we will add a database, login, and registration features.
Get in touch / connect with community
If you have any questions or feedback, I’d love to hear from you! Either drop a comment on the YouTube video, email me (my contact information is in the footer below), or join the Discord to chat with me and other students!