Godot Python MMO Part 2
Welcome back to the tutorial series focused on making an MMO with Godot and Python. In the previous lesson, we set up a most basic chatroom using a very robust framework for communicating packets between client and server.
In this lesson, we will focus on bringing a database into the mix, and demonstrate its usefulness by allowing someone to register an account, and log in to the chatroom. Other users will then know who they’re talking to!
If you prefer, you can view this lesson on YouTube.
I highly recommend you go through the first lesson if you haven’t already. If do you want to start here without viewing the previous lesson, however, you can visit the Releases section of the official GitHub repository, and download the End of lesson 1 code by expanding Assets and downloading Source code (zip).
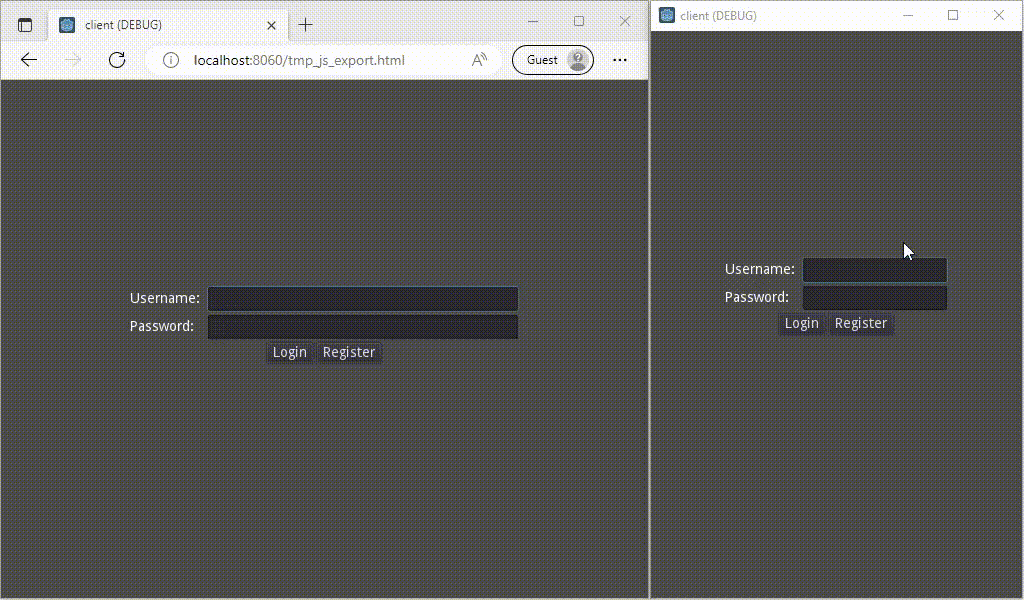
A sneak peek
Here’s a quick look at what we’ll be finishing up by the end of this lesson:
A quick note
From here on out, I will stop adding a disclaimer about Windows vs. non-Windows systems and the difference between python vs. python3. I will always just say python. I will also always assume you are running commands from inside the server/ directory of your project folder with the Virtual Environment activated, unless otherwise stated.
Setting up the database
As hinted in the first lesson, we will be using Django to drive the database, which will be SQLite 3. I chose SQL Lite because its drivers come by default in Python, and the database itself is very portable.
Open up your project folder and create two new files in the server/ directory:
manage.py, andmodels.py.
Also inside the server/ folder, create a folder called migrations/ and place a single, empty file inside called __init__.py. This file is required for database updates to occur later on, but we do not need to do anything with it. Your server directory should look like this now:
server/migrations/__init__.py
venv/__main__.pymanage.pymodels.pypacket.pyprotocol.py
Open up manage.py, paste the following code, which serves as a script for initialising and migrating the database. You don’t need to worry too much about the code itself, it is a fairly standard template when you follow the Django documentation.
import django.conf
import sys
import pathlib

# Required for importing the server app (upper dir)
file = pathlib.Path(__file__).resolve()
root = file.parents[1]
sys.path.append(str(root))

INSTALLED_APPS = [
    'server'
]

DATABASES = {
    'default': {
        'ENGINE': 'django.db.backends.sqlite3',
        'NAME': f'{root}/server/db.sqlite3'
    }
}

django.conf.settings.configure(
    INSTALLED_APPS=INSTALLED_APPS,
    DATABASES=DATABASES,
    DEFAULT_AUTO_FIELD='django.db.models.AutoField'
)

django.setup()


if __name__ == '__main__':
    from django.core.management import execute_from_command_line
    execute_from_command_line(sys.argv)
⚠ Warning ⚠
Part of our new
manage.pyscript defines the settings for the database, so we need to run it every time before we start the server. Therefore, it is crucial you include this as the very first import of__main__.py, so it’s the first thing that gets run every time we start the server.
Add this to the very beginning of __main__.py:
import manage
Next, open models.py and paste the following code:
from django.db import models

class User(models.Model):
    username = models.CharField(unique=True, max_length=20)
    password = models.CharField(max_length=99)
models.py is unsurprisingly where we will define all the data, and relationships between things in our game. We start with the most basic thing we need right now—the concept of a user. Note we do not need to specify some kind of ID for our user, because Django will take care of that for us. We are indicating the username needs to be unique, and its max length is 20, however.
Let’s use our manage.py tool to create the database now. Run the following commands:
python manage.py makemigrations
python manage.py migrate
You should see the following output:
(venv) python manage.py makemigrations
Migrations for 'server':
  migrations\0001_initial.py
    - Create model User

(venv) python manage.py migrate
Operations to perform:
  Apply all migrations: server
Running migrations:
  Applying server.0001_initial... OK
We have successfully set up our database, which stores users, their usernames, and passwords. In the future, we will add more tables to our database, and modify existing ones. Django really helps us manage this with its powerful migrations. More on that in the next lesson, though.
Adding some new packets!
By now, we should be starting to get a bit more comfortable designing and adding packets to our game. Let’s add four more:
OkDenyRegisterLogin
The first two packets are the simplest. They will be sent only when the server wants to tell the client it’s either OK to proceed, or to tell it “no, you can’t do that”. The register and login packets are pretty self-explanatory.
Inside packet.py, add the following new members to the Action enum:
Ok = enum.auto()
Deny = enum.auto()
Login = enum.auto()
Register = enum.auto()
Also add the following packet definitions:
class OkPacket(Packet):
    def __init__(self):
        super().__init__(Action.Ok)

class DenyPacket(Packet):
    def __init__(self, reason: str):
        super().__init__(Action.Deny, reason)

class LoginPacket(Packet):
    def __init__(self, username: str, password: str):
        super().__init__(Action.Login, username, password)

class RegisterPacket(Packet):
    def __init__(self, username: str, password: str):
        super().__init__(Action.Register, username, password)
Note the Deny packet takes in a reason string, which we can send to the client to display to the user. For example, if the client tries to register a new user, but the username is already taken, we can send them a Deny packet with a reason of “This username is already taken” (which is what we will do).
That’s it for now. As you can see, it is very straightforward to define new packets like these.
Adding the Login state
It’s time to add a new state to our protocol, which handles packets only related to login or registration. In other words, the Login state function doesn’t need to worry about checking for Chat packets because they make no sense in the context.
Start by heading over to protocol.py and add a new import at the top of the file so we can use our new User model:
from server import models
Let’s also add a new class member at the end of our __init__ function to keep track of our user.
self._user: models.User = None
Now we can add our new state function:
def LOGIN(self, sender: 'GameServerProtocol', p: packet.Packet):
    if p.action == packet.Action.Login:
        username, password = p.payloads
        if models.User.objects.filter(username=username, password=password).exists():
            self._user = models.User.objects.get(username=username)
            self.send_client(packet.OkPacket())
            self._state = self.PLAY
        else:
            self.send_client(packet.DenyPacket("Username or password incorrect"))

    elif p.action == packet.Action.Register:
        username, password = p.payloads
        if models.User.objects.filter(username=username).exists():
            self.send_client(packet.DenyPacket("This username is already taken"))
        else:
            user = models.User(username=username, password=password)
            user.save()
            self.send_client(packet.OkPacket())
The logic is quite easy to follow. First we handle the Login packet, checking if the username and password combination exists in the database. If so, we tell the user it’s OK to proceed and tells our protocol to move into the PLAY state, where we can start processing Chat packets and the like. If not, we tell the client they got the username or password wrong.
On the other hand, if we get a Register packet, we check if the username already exists. If so, we tell the client no bueno. If not, we create a new user model with the information from the packet, save it to the database, and tell the client they were successful. Note here we do not change states, because we know the player will probably want to log in with their newly registered user, and they need to remain in the LOGIN state to do so.
The last thing we need to do is ensure the protocol is in the LOGIN state as soon as it opens, since logging in or registering is the first thing the client will be trying to do when it connects. Edit the __init__ constructor of protocol.py to set self._state to the login state:
self._state: callable = self.LOGIN
Now is probably a good time to try running the server again and see if we get any errors. It’s important to test your program every chance you get for errors so they don’t build up too much. Remember, if you get an error you don’t know how to fix, you can always ask on the Discord!
Adding the login room in Godot
Let’s change it up a bit and head over to Godot where we will create a new scene for logging in. This scene will be instanced within our main scene to begin with, and we can remove it in code once we have successfully logged in.
In Godot, right-click the res:// folder in the FileSystem and select New Scene. Call this new scene Login and click OK.
Add a new User Interface root node. Then add the following child nodes until your scene tree looks like this:
- Control
- CanvasLayer
- VBoxContainer
- GridContainer
- Label
- LineEdit
- Label2
- LineEdit2
- CenterContainer
- HBoxContainer
- Button
- Button2
- HBoxContainer
- GridContainer
- VBoxContainer
- CanvasLayer
Now rename the following nodes:
| From | To |
|---|---|
| Control | Login |
| Label | Label_Username |
| LineEdit | LineEdit_Username |
| Label2 | Label_Password |
| LineEdit2 | LineEdit_Password |
| Button | Button_Login |
| Button2 | Button_Register |
Set the Horizontal Size Flag property to Expand for the two LineEdit nodes.
Set the Anchor properties to the following for the VBoxContainer node, and ensure the Margin properties are all set to 0:
| Left | 0.2 |
| Top | 0.4 |
| Right | 0.8 |
| Bottom | 0.6 |
This should situate the elements nicely in the centre of the view and will behave responsively on all device screen sizes.
Next, select each label and button and enter the following Text properties:
| Node | Text property |
|---|---|
| Label_Username | Username: |
| Label_Password | Password: |
| Button_Login | Login |
| Button_Register | Register |
Finally, select the GridContainer and change the Columns property to 2.
Scripting the Login scene in Godot!
Time for some Godot scripting! Right-click on the root node of the Login scene and select Attach Script. Leave the default path of res://Login.gd as-is and click Create.
Enter the following code in res://Login.gd:
extends Control

onready var username_field: LineEdit = get_node("CanvasLayer/VBoxContainer/GridContainer/LineEdit_Username")
onready var password_field: LineEdit = get_node("CanvasLayer/VBoxContainer/GridContainer/LineEdit_Password")
onready var login_button: Button = get_node("CanvasLayer/VBoxContainer/CenterContainer/HBoxContainer/Button_Login")
onready var register_button: Button = get_node("CanvasLayer/VBoxContainer/CenterContainer/HBoxContainer/Button_Register")

signal login(username, password)
signal register(username, password)

func _ready():
    password_field.secret = true
    login_button.connect("pressed", self, "_login")
    register_button.connect("pressed", self, "_register")

func _login():
    emit_signal("login", username_field.text, password_field.text)

func _register():
    emit_signal("register", username_field.text, password_field.text)
We define two signals: login and register, and simply tie functions to emit these signals using the entered text whenever a button is pressed.
Sending login and register packets from Godot
Let’s quickly remove our Chatbox node from the Main scene (don’t worry, we will instance it again later in code). We will replace it with the Login scene we just made, but dragging Login.tscn from our FileSystem into our Main Scene Tree.
Now we get to tie it all together in res://Main.gd! Let’s head on over there and make some changes.
Firstly, let’s replace our reference to the chatbox with a reference to our login scene instead. So, replace the _chatbox declaration with
onready var _login_screen = get_node("Login")
var _chatbox = null
Since we removed the Chatbox node, we will need a way to instance it again in code, so add this import and we will use it later:
const Chatbox := preload("res://Chatbox.tscn")
Next, change the last line in the _ready function to tell Godot the first state is not yet determined (because we will load up the game without knowing what we are doing yet). We will also connect the login screen’s signals to some handler functions:
_login_screen.connect("login", self, "_handle_login_button")
_login_screen.connect("register", self, "_handle_register_button")
state = null
Now let’s add those handler functions:
func _handle_login_button(username: String, password: String):
    state = funcref(self, "LOGIN")
    var p: Packet = Packet.new("Login", [username, password])
    _network_client.send_packet(p)

func _handle_register_button(username: String, password: String):
    state = funcref(self, "REGISTER")
    var p: Packet = Packet.new("Register", [username, password])
    _network_client.send_packet(p)
Note these functions are saying “when the login button is pressed, change to the LOGIN state, and send a login packet” (and same for the register button). We change the (not yet defined) LOGIN/REGISTER states so that, when the server sends back an Ok or Deny packet, we will be expecting them and know what to do with them.
Define our two new states now, and you’ll see what I mean:
func LOGIN(p):
    match p.action:
        "Ok":
            _enter_game()
        "Deny":
            var reason: String = p.payloads[0]
            OS.alert(reason)

func REGISTER(p):
    match p.action:
        "Ok":
            OS.alert("Registration successful")
        "Deny":
            var reason: String = p.payloads[0]
            OS.alert(reason)
We are just using OS.alert to relay messages for now, but we can pretty things up later. Also note, we haven’t defined the _enter_game() function yet, so let’s do that now!
func _enter_game():
    state = funcref(self, "PLAY")

    # Remove the login screen
    remove_child(_login_screen)

    # Instance the chatbox
    _chatbox = Chatbox.instance()
    _chatbox.connect("message_sent", self, "send_chat")
    add_child(_chatbox)
We will also need to remove the _chatbox.connect("message_sent", self, "send_chat") line in its old place in the _ready function, since the game will have no idea what _chatbox is at that point.
A quick test
At this point, we can test our game! Let’s run the server and press the play button in the Godot editor.
Try registering a new user and logging in with it. If you are successful, you will be taken to the chatroom again, and things should still be working on that front.
Now we’re in a good position to start sending usernames along with chat messages, so we can see who we’re talking to! After that, we will wrap up this lesson.
Who are you?
Let’s make a slight modification to the Chat packet to allow sending a username along with the message. This is something the client will be able to display.
Head on over to packet.py and modify the Chat packet so that it looks like this:
class ChatPacket(Packet):
    def __init__(self, sender: str, message: str):
        super().__init__(Action.Chat, sender, message)
Next, let’s go back to Godot, open res://Main.gd and let the client hold on to its username so we can send it later. Add the following line before the _ready function:
var _username: String
And at the end of the _handle_login_button function, add the following to capture the username:
_username = username
Next, modify the send_chat function to send the username along with the chat message. We will also tell it to send our username along to the _chatbox.add_message function (which we will modify next to support).
func send_chat(text: String):
    var p: Packet = Packet.new("Chat", [_username, text])
    _network_client.send_packet(p)
    _chatbox.add_message(_username, text)
But first let’s change the PLAY function to correctly interpret the new packet structure:
func PLAY(p):
    match p.action:
        "Chat":
            var username: String = p.payloads[0]
            var message: String = p.payloads[1]
            _chatbox.add_message(username, message)
Finally, let’s jump over to res://Chatbox.gd to modify the add_message function.
func add_message(username: String, text: String):
    chat_log.bbcode_text += username + ' says: "' + text + '"\n'
Let’s test it all out!
Restart your server and run two or more game clients and see if you can hold a conversation with yourself. If you made it this far, congratulations! You have a working chatroom that handles user registration and login. It even stores the information in a database so, even if the server needs to reboot, the application can just retrieve the persistent information it needs.
If you got a bit lost, remember you can always download this code from the official GitHub repository’s releases section. Just download the source code zip asset and merge it with your code from last lesson (or else follow the instructions for how to set up a virtual environment and install prerequisites from the last lesson).
Conclusion
That’s it! In the next lesson, we will be moving towards our long-term goal of getting a working game up and running. All the hard work we’ve been doing so far is going to really pay off. Thanks a lot for reading!
Get in touch / connect with community
If you have any questions or feedback, I’d love to hear from you! Either drop a comment on the YouTube video, email me (my contact information is in the footer below), or join the Discord to chat with me and other students!