Godot Python MMO Part 4
Welcome back to yet another lesson! In the previous lesson, we finished setting up our actors who can move around in the game, kicking off our long-term goal.
In this lesson, we will discuss the lesson 3 homework solutions, and focus on ironing out any bugs and making small improvements.
If you prefer, you can view this lesson on YouTube.
As always, you can visit the Releases section of the official GitHub repository, and download the End of lesson 3 code by expanding Assets and downloading Source code (zip). You will need to refer to parts 1 and 2 to set up the virtual environment, set up the database, and run the server (if you haven’t already).
A sneak peek
Here’s a quick look at what we’ll be finishing up by the end of this lesson:
I am running the game in the browser on my iPhone, yet the typing is a little experimental…
Homework solutions
Here is the solution to last lesson’s homework. Here is a reminder of the problem we have to fix:
When you log out and log in again, you will always just start again in the top-left corner.
And the hint was:
Use Django’s model.save function somewhere in this code!
So the problems stems from the fact that we aren’t saving the actor’s position to the database. The way to save something to the database is by calling Django’s .save method on the model we need to save.
What is the model we need to save? The InstancedEntity component of our Actor model contains the x and y attributes, so we need to save that.
Where do we need to do this? Preferably at the end of the _update_position function in protocol.py, right before we return True.
self._actor.instanced_entity.save()
It might also be a good idea to save the actor generally in the onClose function, to make sure we get the final sync before the client disconnects cleanly. Although that is probably not needed in most cases.
# Override
    def onClose(self, wasClean, code, reason):
        if self._actor:
            self._actor.save()
        self.factory.players.remove(self)
        print(f"Websocket connection closed{' unexpectedly' if not wasClean else ' cleanly'} with code {code}: {reason}")
On the client side, we need to make sure we are initialising our actor to the server position when we first receive it. This is done by adding the following code to the update function of Actor.gd, just after where we set server_position:
if not initialised_position:
    initialised_position = true
    body.position = server_position
    if is_player:
        _player_target = server_position
We need to define initialised_position at the top of the file, too:
var initialised_position: bool = false
We might get in trouble if the first update is called before our KinematicBody2D node is ready, so we should make sure we only update the actor after everything is ready. For this, we need to change the default behaviour in model.gd. Replace the whole contents of the file to the following (the notable change is we are not calling the update function in the init function any more):
extends Node

var initial_data: Dictionary
var data: Dictionary = {}

func init(init_data: Dictionary):
    initial_data = init_data
    return self

func update(new_model: Dictionary):
    data = new_model
Then we can let the actor call the first update once all its nodes are ready. Add this _ready function to Actor.gd:
func _ready():
    update(initial_data)
That should be it! Test your game to make sure you can log in, move somewhere in the middle of the screen, and log out. Log in again and you should be put right back where you left off!
Note: this is just one approach at a solution, and yours may have been different! There’s a decent chance your solution is better than mine, so feel free to call me out in the Discord 🙂
Fixing the other problems
Recall problem #3 from last time:
An invisible actor who suddenly moves will appear to come out of the top-left corner and move to their proper position.
You might notice that, by fixing problem #1 (above), we have also fixed this! That’s because, when we broadcast our model to everyone by moving, their clients are now equipped to properly add our actor to the correct location and we won’t be spawning in the top-left corner any more.
Finally, let’s address problem #2:
When a new player joins and starts moving, you will see them pop up right away, but new players won’t see you unless you move. In other words, if you are staying perfectly still when someone new joins, you will be invisible to them.
This one’s a little trickier, but it’s nothing we can’t handle.
Firstly, we need to make sure newly connecting clients are broadcasting their model to everyone who is already connected—not just themselves. So replace the send_client call for the initial ModelData packet in the LOGIN state to a broadcast call:
self.broadcast(packet.ModelDataPacket(models.create_dict(self._actor)))
Next, we need to keep track of which other players our protocol knows about. In protocol.py, add the following extra member variable in the __init__ constructor:
self._known_others: set['GameServerProtocol'] = set()
This set will hold all the other protocols who have made themselves visible to us in any way.
Next, let’s make sure we can add to our known list of other protocols once we receive a model data packet, so add this to the PLAY state where we process ModelData packets:
if sender not in self._known_others:
    sender.onPacket(self, packet.ModelDataPacket(models.create_dict(self._actor)))
    self._known_others.add(sender)
So if we get a packet from someone not in our known list of others, we:
- Send them a model packet describing our own actor
- Add them to our list of known others
Note that sending the other protocol our own actor model (1) will, in turn, trigger them to perform the above actions, because they are receiving a ModelData packet themselves. This does cause them to send us their model a second time, but by then, they will be known to us so we don’t get stuck in an infinite loop. This is slightly wasteful though, but I think the simplicity of this solution warrants the extra packet sent.
It turns out, this small change to protocol.py completely fixes problem #2. When someone new joins, they broadcast their model to everyone. Then, everyone will broadcast their own models in return (just one time), hence preventing anyone from staying “invisible”.
Improving performance
We can lessen the amount of data we are sending over the network by only sending the relevant changes to existing models, rather than sending the full model every time. We will call this a ModelDelta now instead of a ModelData. A ModelDelta might contain the full data, like when you send it to someone for the first time, but more generally, it can contain less than the full data.
Let’s start by renaming our ModelData action/packet to ModelDelta. The best way to do this is probably to click the Search button in VS Code on the left, type ModelData in the Search box, and then type ModelDelta in the Replace box. Then click the Replace all button.
Next, we need a new function to calculate the delta based on some before-and-after model information. In models.py, add the following new function:
def get_delta_dict(model_dict_before: dict, model_dict_after: dict):
    """
    Returns a dictionary containing all differences between the supplied model dicts
    (except for the ID and Model Type).
    """

    delta: dict = {}

    for k in model_dict_before.keys() & model_dict_after.keys():  # Intersection of keysets
        v_before = model_dict_before[k]
        v_after = model_dict_after[k]

        if k in ("id", "model_type"):
            delta[k] = v_after
        if v_before == v_after:
            continue

        if not isinstance(v_before, dict):
            delta[k] = v_after
        else:
            delta[k] = get_delta_dict(v_before, v_after)

    return delta
We supply two model dictionaries (before & after), and output a dictionary containing their differences. The output dictionary will keep any id or model_type fields, though, as these are required for all model packets.
The function is conceptually simple: we loop through all the keys the two supplied dictionaries have in common, and compare each dictionary’s values:
- If the values are differing or the key is
idormodel_type, we choose to keep the “after” value. - Otherwise, if the values are differing dictionaries, we need to recurse in a step to compare these dictionaries.
At the end, we have a fully recursive dictionary of only id and model_type keys as well as any keys/values that changed between the before and after dictionaries. This will be perfect for sending and receiving in a packet.
Now we just need to modify the tick function in protocol.py to only broadcast the delta if we update the actor’s position. We will use our new get_delta_dict function to do this. The logic at the end of the tick function should now look like this:
# To do when there are no packets to process
elif self._state == self.PLAY:
    actor_dict_before: dict = models.create_dict(self._actor)
    if self._update_position():
        actor_dict_after: dict = models.create_dict(self._actor)
        self.broadcast(packet.ModelDeltaPacket(models.get_delta_dict(actor_dict_before, actor_dict_after)))
Inside Godot, we need to interpret the model updates slightly differently now inside Actor.gd, because it’s not guaranteed that any of the keys we are trying to access actually exist in the dictionary any more. So basically we just need to add a bunch of if statements checking if the diction has the key we want to use. Change the update function to the following:
func update(new_model: Dictionary):
    .update(new_model)

    if new_model.has("instanced_entity"):
        var ientity = new_model["instanced_entity"]

        if ientity.has("x") and ientity.has("y"):
            server_position = Vector2(float(ientity["x"]), float(ientity["y"]))

            if not initialised_position:
                initialised_position = true
                body.position = server_position
                if is_player:
                    _player_target = server_position

        if ientity.has("entity"):
            var entity = ientity["entity"]
            if entity.has("name"):
                actor_name = ientity["entity"]["name"]

                if label:
                    label.text = actor_name
And that’s it! To see the improvement, let’s suppose we are moving only horizontally and look at the update data we would have been sending to the client before and compare with what we are sending now.
Before (full data)—223 bytes
{
    "a": "ModelData",
    "p0": {
        "id": 2,
        "model_type": "Actor",
        "user": 2,
        "instanced_entity": {
            "id": 12,
            "model_type": "InstancedEntity",
            "x": 198.21274496741077,
            "y": 78.41678496432130,
            "entity": {
                "id": 2,
                "model_type": "Entity",
                "name": "tristan"
            }
        }
    }
}
After (delta)—138 bytes
{
    "a": "ModelDelta",
    "p0": {
        "id": 12,
        "model_type": "Actor",
        "instanced_entity": {
            "id": 12,
            "model_type": "InstancedEntity",
            "x": 198.21274496741077
        }
    }
}
I have formatted the data to make it easier to read and view, but in reality, there would be no line breaks, spaces, or indents in the data. The number of bytes indicated in the heading is for the real life case.
So you can see we have nearly halved the number of bytes we send for updates to our model in this case. As actors become more complicated, however, this would become more and more efficient so is definitely an improvement worth making early on.
Rubber banding
You might notice we never actually set the player’s position to equal the server position in Actor.gd. This is because it can be quite a jarring experience for the player if they are even slightly out of sync with the server. While we do everything we can to stop this from happening, getting out of sync with the server is inevitable over long periods of game time.
When the difference between the client’s position and the server’s position is great enough, we’d like to “autocorrect” by snapping the player back to the server’s position. This is known as rubber banding.
To do this, we need to define a rubber banding radius, which describes how far is too far? I’ll choose 200 pixels, which is significant enough to warrant correction, and not so small that it will be disruptive to the player. Add this to Actor.gd:
var rubber_band_radius: float = 200
Then, in the update function, add the following elif clause to the if not initialised_position statement (i.e., we do this if we have already initialised the player’s position in a previous update, and this update is telling us a new position):
elif (body.position - server_position).length() > rubber_band_radius:
    # Rubber band if body position too far away from server position
    body.position = server_position
That’s all you need to do to implement rubber banding. A good way to test this is to force the client to go out of sync with the server by setting the speed variable to something much different from 70 (which is what the server is expecting). For example, set speed to 200 in Actor.gd and leave the server code alone. Test your game, and notice the player is snapped back every time it is more than 200 pixels away from the expected server position.
A quick bug fix
There is a really rare bug, where the server can crash if it tries to send a message directly to a client who has just disconnected. Let’s fix this really quickly with a simple try-except block. First, let’s import the following to protocol.py:
from autobahn.exception import Disconnected
Now, in the send_client function, just replace the sendMessage call with the following:
try:
    self.sendMessage(b)
except Disconnected:
    print(f"Couldn't send {p} because client disconnected.")
Optimising for mobile
Currently, the game doesn’t work too well on mobile because focusing the chatbox requires the user to either press Enter, or click inside it. Currently, the only way to send a chat message is by pressing Enter.
Of course, mobile users don’t have an Enter key, so we need to add a button to send the message as well. As well as this, currently, clicking any UI in the chatbox causes the player to start moving in that direction which is not what we want.
Let’s add the button first, and then address the problem of clicking UI elements.
Adding the send button
Let’s add a Button node to our chatbox scene. Open up Chatbox.tscn, right-click the HBoxContainer node, and add a new child of type Button.
You can set the button text to Send in the inspector properties.
Inside the Chatbox.gd script, let’s add a reference to our button at the top of the file:
onready var button = get_node("CanvasLayer/VBoxContainer/HBoxContainer/Button")
In the _ready function of Chatbox.gd, connect the button’s pressed signal to a new function called button_pressed:
button.connect("pressed", self, "button_pressed")
Finally, add a new function called button_pressed, which, in turn, just calls the text_entered function with the input field’s existing text:
func button_pressed():
    text_entered(input_field.text)
Don’t move when clicking inside the chatbox
This is quite a simple fix. Inside Main.gd, we should be using a built-in function called _unhandled_input instead of regular _input. _unhandled_input is only called when the user input event is not already handled by something else automatically. For example, button presses and input line focusing is already handled separately, so we do not check for that in the _unhandled_input function.
If you test the game again now, you will find that clicking the chatbox UI won’t cause your player to move, which is great. Unfortunately, you will find that even clicking inside the RichTextField chat log will prevent the player from moving. This is not great.
To fix this issue, go back to the Godot Chatbox scene editor, select the VBoxContainer node, and set Filter to Ignore under Mouse settings in the right-hand side inspector. Now repeat this process for the RichTextLabel node. This will tell Godot to ignore any mouse input for that field, so it can be handled by our Main.gd script.
Test the HTML5 export on mobile (if you have Wi-Fi)
Let’s first do a quick test to make sure everything is working as usual. If so, read on to test the game on your mobile phone.
Your phone will need to be connected to Wi-Fi on the same network your computer is running. You will also need to know your computer’s local IP address. This means you will need to open a new terminal (keep the old one still open and running) and run the following depending on your OS:
Mac/Linux
ifconfig | grep -Eo 'inet (addr:)?([0-9]*\.){3}[0-9]*' | grep -Eo '([0-9]*\.){3}[0-9]*' | grep -v '127.0.0.1'
Windows
(Get-NetIPAddress | Where-Object {$_.AddressState -eq "Preferred" -and $_.ValidLifetime -lt "24:00:00"}).IPAddress
Either command should print your local IP address.
Once we know our computer’s IP address and your phone is on the same network, let’s re-export our game to HTML5.
Firstly, edit the 127.0.0.1 in Main.gd and change it to the IP address for your machine.
Now, in Godot, go to Project > Export and this time, be sure to check the Experimental Virtual Keyboard option to allow mobile devices to type in the line edit fields.
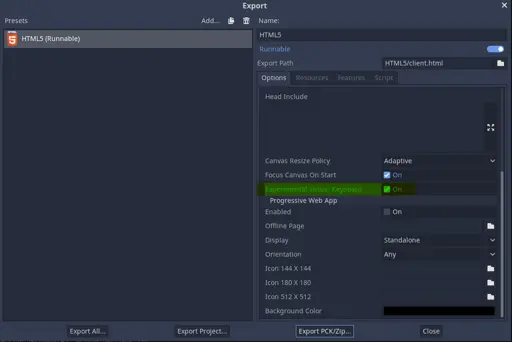
When you click Export Project, and it asks you to save the file, make sure you call it index.html and save it inside a folder you will remember. I would recommend saving it inside your project folder under client/HTML5/.
Next, open a terminal window inside the folder you saved index.html to and run the following command:
python -m http.server 80
You should see the following output:
Serving HTTP on :: port 80 (http://[::]:80/) ...
Now open your preferred web browser app on your phone (e.g., Chrome, Safari, etc.) and type your computer’s local IP address into the URL bar. Once you go to this address, it should start loading your game! Try playing the game and make sure everything works.
You might notice the experimental virtual keyboard has some display issues, but this particular feature of Godot is still quite early days and should improve. I’ve found it to at least be functional.
You should still be able to log in to your game if you run it on your PC without needing to change the IP address back in Main.gd. If it doesn’t work, though, you should just change it back to 127.0.0.1.
Conclusion
We’re getting very close to the end of this course. In the next part, we will be focusing on allowing the user to choose an avatar during registration, and prettying up the client side with graphics.
After part 5 is released, I will be creating ad-hoc lessons per request so you guys can vote for what you want. The polls will be posted to my YouTube channel every week or so, so make sure you’re subscribed to get notified and vote for the next feature you want to see me implement.
See you in the next part!
Get in touch / connect with community
If you have any questions or feedback, I’d love to hear from you! Either drop a comment on the YouTube video, email me (my contact information is in the footer below), or join the Discord to chat with me and other students!