Godot Python MMO Part 5
Welcome to the final lesson in the core series of the Godot Python MMO! In the previous lesson, we finished up most of the logic for our game.
In this lesson, we will be finishing things off by adding some much-needed graphics, and allowing players to express themselves by choosing their own avatars during registration!
If you prefer, you can view this lesson on YouTube.
As always, you can visit the Releases section of the official GitHub repository, and download the End of lesson 4 code by expanding Assets and downloading Source code (zip). You will need to refer to parts 1 and 2 to set up the virtual environment, set up the database, and run the server (if you haven’t already).
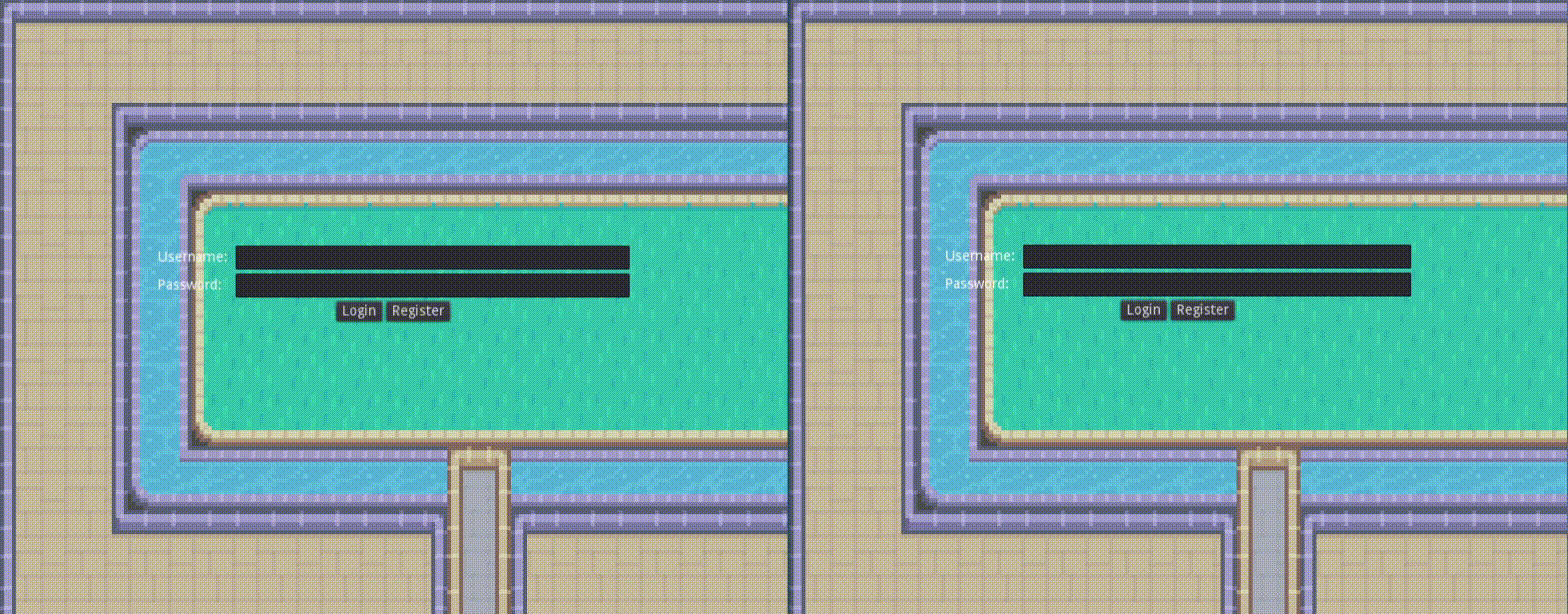
A sneak peek
Here’s a quick look at our final product!
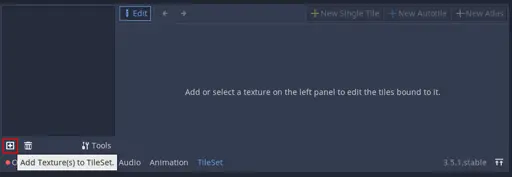
Obtaining our assets
The graphics in this lesson will come from Kenney’s Assets which is an excellent resource for free game assets.
We will be using the RPG Urban Pack, which is nice because it includes six character sprite sheets, as well as a variety of terrain tiles. Just download the zip archive for this pack, and copy tilemap_packed.png from the Tilemap/ folder to the client/ folder of your project.
Making some sprites
Time to get these assets loading in our game. First, we’re going load the sprites from the tilemap to our actor. If we do this correctly, we should be able to easily change the appearance of our actor in code, making it easy for us when we want to introduce custom avatars in the game.
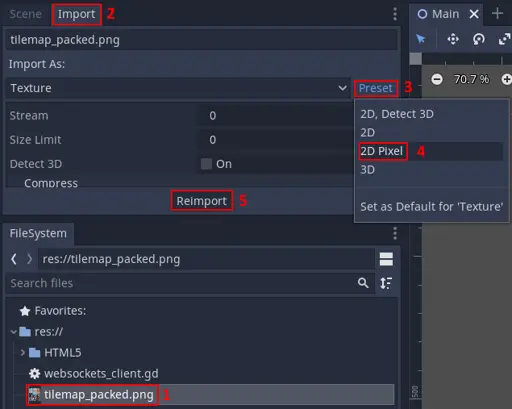
We have already imported our tilemap to Godot, but it will be quite blurry by default which is not ideal for pixel art. To fix this, open Godot and select tilemap_packed.png from the FileSystem. Click on the Import tab at the top-left (next to the Scene tab). Select 2D Pixel under the Preset menu and click Reimport. Once you’re done, click on the Scene tab to switch back again. Now our pixel art will look nice and crisp!
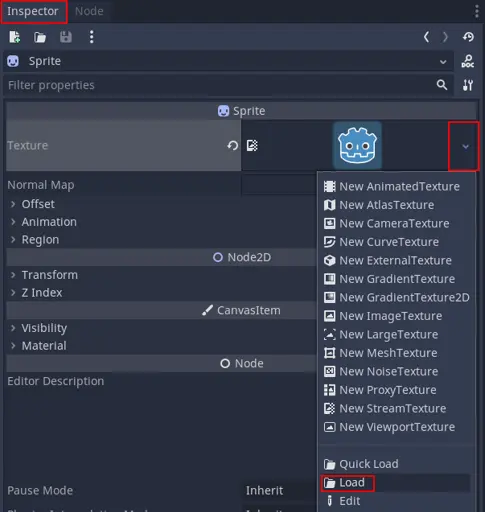
Now it’s time to attach the sprites to our actor. Open the Actor.tscn scene and select the Sprite node. On the right-hand side inspector, select Texture, choose Load, and open tilemap_packed.png.
The sprite will take up the entire sprite sheet at this point, which is obviously not what we want. Instead, we would like to load the characters from the right-hand side of the sheet as individual frames which we can animate.
To do this, ensure the Sprite node is still selected and expand the Region section in the Inspector. Make sure Enabled, On is ticked, and then you can open the TextureRegion tab at the bottom of the window (in the same area as the Output and Debugger).
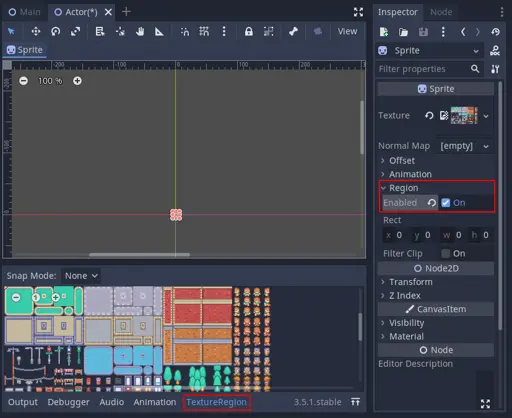
In the TextureRegion tab, choose Grid Snap from the Snap Mode dropdown and choose 16px by 16px for the Step. This is specific to Kenney’s tileset we downloaded, but if you are working with a different tileset, the grid step size may be different.
Now you are free to zoom in with the mouse scroll wheel, pan with middle click, and left click and drag the four rows of first guy on the right-hand side of the texture to select our default avatar sprite sheet.
Our sprites will be a bit small on our screen, so before we set up the animations, let’s go ahead and blow them up a bit. Ensure the Sprite node is still selected, and expand the Transform section in the Inspector. Choose 4 by 4 as the Scale.
Animations!
Now we have selected our sprite sheet correctly, let’s create some animations. Ensure the Sprite node is still selected in Actor.tscn. Expand the Animation section in the editor, and set the properties:
- Hframes: 4
- Vframes: 3
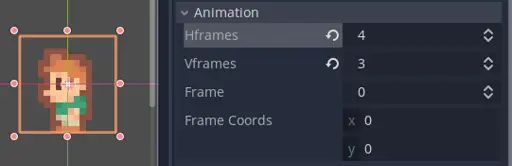
Again, this is specific to Kenney’s asset we are using in this lesson, since there are three rows and four columns in each character sprite sheet.
Now, right-click the Sprite node, choose Add Child Node and add an AnimationPlayer sub-node.
You will see an Animation tab at the bottom of the window (in the same area as the Output and Debugger). Open the Animation tab.
We will add four animations for each of the four directions we can walk in. To add the first one:
- Click the Animation button and select New at the top of the list.
- Name the new animation walk_left.
- Click the Animation Looping icon so we can see a good preview of our animation.
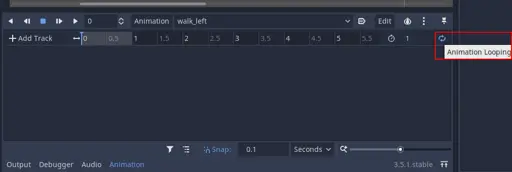
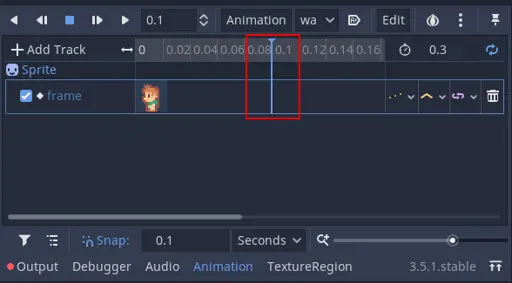
- Change the Animation length to 0.3 seconds by.
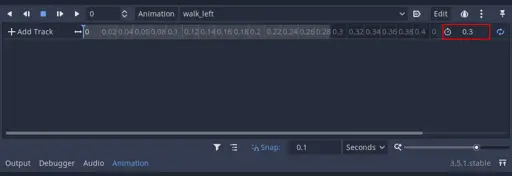
- Zoom in to the animation timeline by holding Ctrl and scrolling your mouse wheel.
- Select the Sprite node (while keeping the Animation tab open), expand the Animation section, and click the Key icon next to Frame: 0.
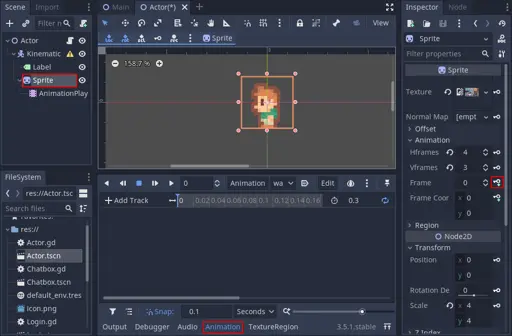
- Just click Create when it asks you if you would like to create a new track.
- Move the animation timeline to 0.1 seconds by clicking near 0.1 at the top of the track.
- In the Sprite Inspector, click the Up arrow a few times in the Frame property to get to the next frame (frame 4 in this case) in our walk_left animation. Click the Key icon again when you are at the correct frame.
- Repeat the previous step to key the final frame in our walk_left animation.
- Click the Play button at the top of the in the Animation panel to preview the walk_left animation.

Let’s duplicate our animation to easily create the next animation.
- In the Animation panel, click the Animation button and select Duplicate.
- Name the new animation walk_down.
- Select all the nodes in the timeline by clicking and dragging in the timeline.
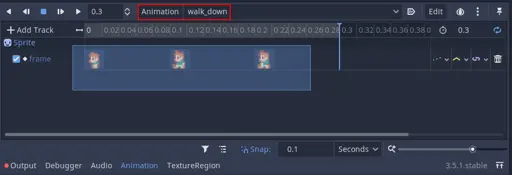
- Delete the nodes you have selected by pressing the Delete button on your keyboard.
- Move the animation timeline to 0 seconds by clicking near 0 at the top-left of the track.
- Select the Sprite node (while keeping the Animation tab open), expand the Animation section, choose the first walking down frame (frame 1 in this case) and click the Key icon next to Frame: 1.
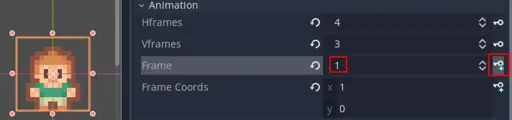
- Click the Up arrow a few times in the Frame property to get to the next frame (frame 5 in this case) in our walk_down animation. Click the Key icon again when you are at the correct frame.
- Repeat the previous step to key the final frame in our walk_down animation.
- Click the Play button at the top of the in the Animation panel to preview the walk_down animation.
Now repeat that duplication process to add animations for walk_up and walk_right.
Scripting the animations
Now that we have our four animations for walking in each direction, it’s time to get them animating in our game!
Open the Actor.gd script, and we will add the else clause to our _physics_process function’s if (target - body.position).length() > 5 statement:
else:
    velocity = Vector2.ZERO
This was an oversight from the previous lesson which becomes more important in this lesson. It is saying we need to reset our velocity to zero when we arrive close to our target destination.
Next, let’s add a reference to our AnimationPlayer node at the top of Actor.gd:
onready var animation_player: AnimationPlayer = get_node("KinematicBody2D/Sprite/AnimationPlayer")
Now we will add a new function to Actor.gd:
func _process(delta):
# Get the direction angle
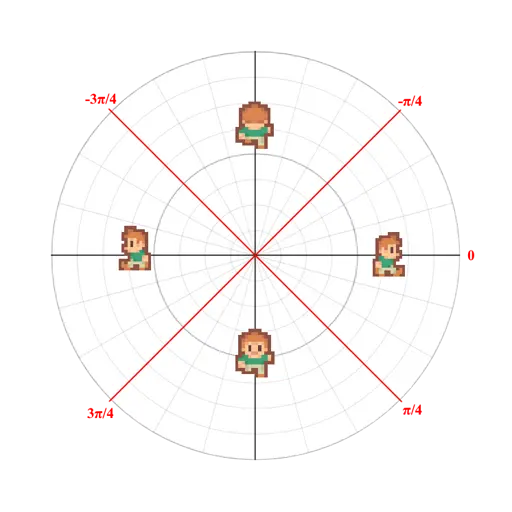
var angle = velocity.angle()
# Check which quadrant the angle is in and play animation accordingly
if velocity.length() <= 5:
animation_player.stop()
elif -PI/4 <= angle and angle < PI/4:
animation_player.play("walk_right")
elif PI/4 <= angle and angle < 3*PI/4:
animation_player.play("walk_down")
elif -3*PI/4 <= angle and angle < -PI/4:
animation_player.play("walk_up")
else:
animation_player.play("walk_left")
This is Godot’s built-in _process function, which runs each frame. It is different from _physics_process in that it runs as much as possible, and should be used for non-physics based calculations. In this case, we are using it to play our animations according to the direction we are moving in.
It works by identifying which quadrant our player’s direction lies in. In Godot, angles are measured in Radians by default, starting at \(0\) on the positive \(x\)-axis, and increasing clockwise to \(\pi\) and decreasing counter-clockwise to \(-\pi\). The quadrants we are interested in are the ranges:
- \(-\pi/4 \leq \theta \lt \pi/4\),
- \(\pi/4 \leq \theta \lt 3\pi/4\),
- \(-3\pi/4 \leq \theta \lt -\pi/4\),
- the remaining area (on a branch cut of the circle).
Let’s test it out by playing our game. You should see the animation changes correctly, according to which direction we are going.
Custom avatars!
Note how easy it is to change your avatar now, and still have all the animations work correctly. Click the Sprite node of our Actor scene open the TextureRegion panel at the bottom, and select a different character’s 4×3 region. Run the game again and see how easy it was!
Let’s take advantage of that.
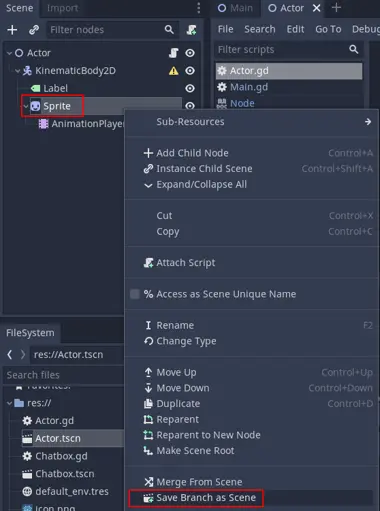
Change the region back to the first guy (this will help keep a future calculation simple), and let’s also make a copy of our Sprite and AnimationPlayer nodes so we can use them elsewhere. To do this, right-click the Actor scene’s Sprite node and click Save Branch as Scene. Save it as Avatar.tscn.
Open your new Avatar.tscn scene by double-clicking it in the FileSystem, and rename the root node to Avatar and save the scene.
Go back to the Actor.tscn scene, and rename the branched node from Sprite to Avatar.
You will now need to update references to the Sprite and AnimationPlayer nodes in Actor.gd to:
onready var sprite: Sprite = get_node("KinematicBody2D/Avatar")
onready var animation_player: AnimationPlayer = get_node("KinematicBody2D/Avatar/AnimationPlayer")
What we have done is abstract the Sprite and AnimationPlayer nodes out to its own scene, so we can re-use it in the Login/Registration scene. This will help reduce repetitive code and avoid potential bugs.
Next, let’s get started on modifying our registration process to allow selecting an avatar.
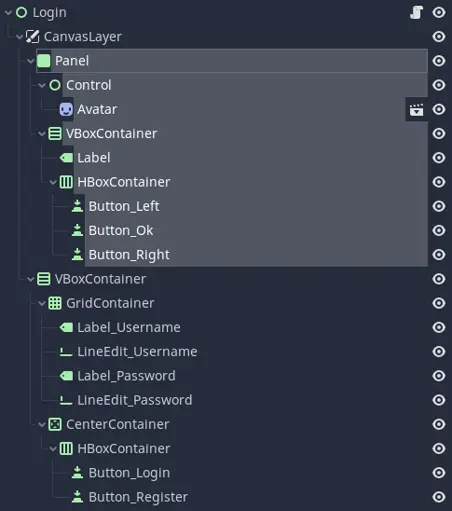
Open the Login.tscn scene and add a new hierarchy of node types under the CanvasLayer. It should look like this:
- Login
- CanvasLayer
- Panel
- Control
- Avatar (need to drag from FileSystem)
- VBoxContainer
- Label
- HBoxContainer
- Button
- Button2
- Button3
- Control
- Panel
- CanvasLayer
Rename buttons to Button_Left, Button_Ok, and Button_Right.
Add text to each of the buttons by selecting the respective Button node, and entering the corresponding text in the Inspector:
<OK>
Add text to the label: Choose your avatar! and set the Align property to Center.
Set Size Flags property for each Button node to Horizontal: Expand.
Set the Panel node’s Anchor properties to:
- Left: 0.4
- Top: 0.25
- Right: 0.6
- Bottom: 0.33
Reset the Panel node’s Margin properties to all zero.
Set the Control node’s (direct parent of Avatar) Anchor properties to:
- Left: 0.5
- Top: -1
- Right: 0.5
- Bottom: 0
Reset the Control node’s (direct parent of Avatar) Margin properties to all zero.
Set the VBoxContainer node’s Anchor properties to:
- Left: 0.1
- Top: 0.1
- Right: 0.9
- Bottom: 0.9
Set the VBoxContainer node’s Margin properties all zero.
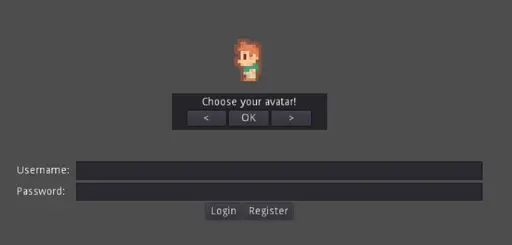
The interface should now look like this:
Next, we will script up the new user interface so our new panel only shows when we try to register, and is hidden otherwise.
Scripting our new registration interface
Open the Login.gd script, and we will need to add some reference to our new panel elements at the top of the script:
onready var avatar_panel: Panel = get_node("CanvasLayer/Panel")
onready var avatar_sprite: Sprite = get_node("CanvasLayer/Panel/Control/Avatar")
onready var avatar_animation_player: AnimationPlayer = get_node("CanvasLayer/Panel/Control/Avatar/AnimationPlayer")
onready var avatar_left: Button = get_node("CanvasLayer/Panel/VBoxContainer/HBoxContainer/Button_Left")
onready var avatar_ok: Button = get_node("CanvasLayer/Panel/VBoxContainer/HBoxContainer/Button_Ok")
onready var avatar_right: Button = get_node("CanvasLayer/Panel/VBoxContainer/HBoxContainer/Button_Right")
Now we need a way of keeping track of the avatar we have selected, so add this to the top of Login.gd, just above the signal definitions:
var avatar_id: int = 0
Now, in the _ready function, make sure to set our new avatar panel’s visibility to false, and connect the register button to a new function called _choose_avatar, which will un-hide the panel. While we’re here, we will also connect our left, OK, and right buttons to their respective functions for choosing an avatar.
func _ready():
    password_field.secret = true
    avatar_panel.visible = false

    login_button.connect("pressed", self, "_login")
    register_button.connect("pressed", self, "_choose_avatar")

    avatar_right.connect("pressed", self, "_next_avatar")
    avatar_ok.connect("pressed", self, "_register")
    avatar_left.connect("pressed", self, "_prev_avatar")
Here is the _choose_avatar function and its helpers:
func _choose_avatar():
    avatar_panel.visible = true
    avatar_animation_player.play("walk_down")

func _next_avatar():
    avatar_id += 1
    if avatar_id >= 6:
        avatar_id = 0
    _update_sprite()

func _prev_avatar():
    avatar_id -= 1
    if avatar_id < 0:
        avatar_id = 5
    _update_sprite()

func _update_sprite():
    avatar_sprite.set_region_rect(Rect2(368, avatar_id * 48, 64, 48))
The _choose_avatar function simply un-hides the panel and starts animating the preview sprite.
The _next_avatar and _prev_avatar functions are responsible for cycling through each avatar and setting our avatar_id variable accordingly.
The _update_sprite function is responsible for driving the preview of the avatar. The values are specific to your sprite sheet, but this one works for the Kenney asset we are using which includes six avatar sprites sheets, whose regions top-left positions are at x = 368 and y is some multiple of 48 between 0 and 288. The regions are 64 pixels wide and 48 pixels high. Hence the formula for setting the region in the _update_sprite function.
Now we can update the _register function to send the avatar ID along with the username and password in our register packet:
func _register():
    emit_signal("register", username_field.text, password_field.text, avatar_id)
We also need to update the _handle_register_button in Main.gd to accept the new argument:
func _handle_register_button(username: String, password: String, avatar_id: int):
    state = funcref(self, "REGISTER")
    var p: Packet = Packet.new("Register", [username, password, avatar_id])
    _network_client.send_packet(p)
Update the register packet and actor model
Now that we have everything set up to register an avatar ID on the client side, we need to update the server side to support this.
First, let’s update the RegisterPacket in packet.py to expect an integer avatar_id payload:
class RegisterPacket(Packet):
    def __init__(self, username: str, password: str, avatar_id: int):
        super().__init__(Action.Register, username, password, avatar_id)
Next, update the Actor model in models.py to include this new field:
class Actor(models.Model):
    user = models.OneToOneField(User, on_delete=models.CASCADE)
    instanced_entity = models.OneToOneField(InstancedEntity, on_delete=models.CASCADE)
    avatar_id = models.IntegerField(default=0)
Setting the default=0 parameter allows all existing actors in the database to have the default avatar (the guy in the top-right of the sheet) when we run the next database migration.
Now come on over to protocol.py where we will modify our LOGIN state:
elif p.action == packet.Action.Register:
    username, password, avatar_id = p.payloads
    if models.User.objects.filter(username=username).exists():
        self.send_client(packet.DenyPacket("This username is already taken"))
    else:
        user = models.User(username=username, password=password)
        user.save()
        player_entity = models.Entity(name=username)
        player_entity.save()
        player_ientity = models.InstancedEntity(entity=player_entity, x=0, y=0)
        player_ientity.save()
        player = models.Actor(instanced_entity=player_ientity, user=user, avatar_id=avatar_id)
        player.save()
        self.send_client(packet.OkPacket())
The main difference here is we are unpacking the avatar_id from the RegisterPacket payloads, and inserting it into our player model.
Let’s run a new database migration, since we have updated our Actor model (make sure you’ve saved the changes to all your Python files):
python manage.py makemigrations
python manage.py migrate
You should see the following output in the terminal window:
(venv) python manage.py makemigrations
Migrations for 'server':
  migrations\0002_actor_avatar_id.py
    - Add field avatar_id to actor

(venv) python manage.py migrate
Operations to perform:
  Apply all migrations: server
Running migrations:
  Applying server.0002_actor_avatar_id... OK
Now we should be able to test our game, and successfully register with an avatar_id. The only problem is, we aren’t interpreting/displaying players’ avatars in-game yet. Let’s do that now!
Interpreting actor’s avatars
Now, open the Actor.gd script, and inside the update function, let’s make a new check for actor_id:
# Set the correct sprite for the actor's avatar ID
if new_model.has("avatar_id"):
    sprite.set_region_rect(Rect2(368, new_model["avatar_id"] * 48, 64, 48))
This is the same formula for setting the sprite’s texture region we discussed at the end of the Scripting our new registration interface section
And that’s it! If you test the game now, with a couple clients connected, you should see their proper avatars walking around!
Prettying it up
Now we’re pretty much finished! The last thing you might want to do is just add some pretty terrain tiles so it looks more like a proper game.
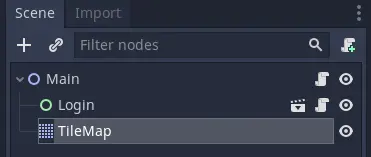
To do this, open up the Main.tscn scene in the 2D editor and add a new TileMap node as a child of the root node.
With the new TileMap node selected, set the Cell Size property in the Cell section of the Inspector to 16 by 16.
Select the Tile Set property in the Inspector and choose New TileSet. Now click on the new TileSet in the inspector and a new TileSet tab will appear at the bottom panel (alongside the Output and Debugger tabs).
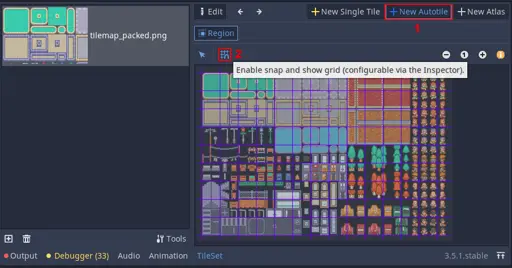
We want to set up some auto-tiling, so we don’t have to manually choose which tiles go where.
Click the + icon at the lower-left of the new TileSet panel, and chose tilemap_packed.png.
You should see your assets appear in the TileSet panel. Now, click New Autotile at the top-right of the TileSet panel, and click the Enable snap icon.
You will have to just select something randomly for now, by left-clicking and dragging your mouse in the region editor below. Once you’ve selected something, you can then choose 16 by 16 as the Step in the Inspector under Snap Options. This allows you to re-select just the grass tiles for now (the first 8×3 block in the top-left of the texture).
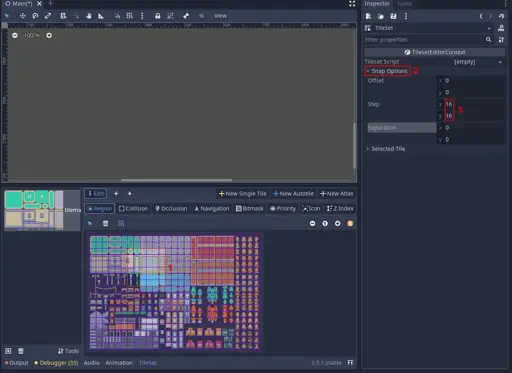
Now we can select the grass region (zoom with Ctrl + Mouse Wheel and pan with the Middle Mouse Button)
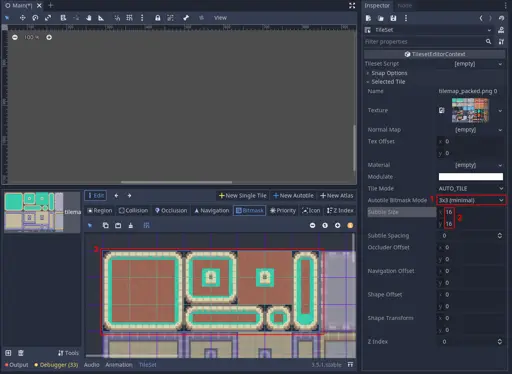
Now, to configure the auto-tiling rules, open the Bitmask tab. Under the Selected Tile section in the Inspector, choose 3×3 (minimal) for the Autotile Bitmask Mode and choose a Subtile Size of 16 by 16.
Now you can left-click inside the grass tiles in the TileSet panel and place some red bitmasks. To remove a bitmask, simply right-click one of the red squares. The idea behind this is,
- If you want a tile to be drawn only if it has no neighbours, set just the middle bit.
- If you want a tile to be drawn when there is a neighbour tile to the right of it, set the middle bit and a bit to the right of it.
- Et cetera.
It is a bit difficult to explain in words, so let me just link to HeartBeast’s excellent explanation (it’s well worth watching, trust me).
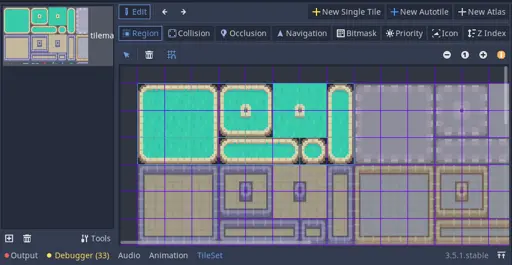
For our TileSet, the bitmask should look like this:
Now that we’ve defined the bitmask for the grass region, let’s do the others. A quick way to do this is to:
- Click the New Autotile button at the top-right of the TileSet panel
- Select the next 8×3 region over by clicking and dragging inside the Region editor
- Choose 3×3 (minimal) in as the Tile Mode in the Inspector under the Selected Tile section
- Click the left arrow button (⬅) at the top of the TileSet window
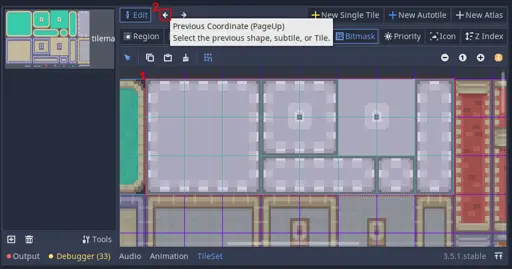
- This takes you back to the previous region. Switch to the Bitmask tab and click the Copy bitmask button
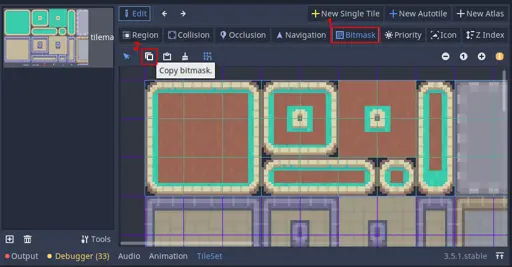
- Now click the right arrow button (➡) at the top of the TileSet window.
- This takes you back to our new region we’re currently working on. Click on the Paste bitmask button. If it doesn’t look quite right, make sure you’ve definitely selected 3×3 (minimal).
Finally, select the TileMap node in the Main scene tree again, set the Scale properties under the Transform section in the Inspector to 4 by 4 so the tiles aren’t too small.
Now, with the TileMap node still selected, use the controls on the right-hand side to select a region (grass, concrete, water, etc.) and then you can click and drag in the 2D editor to begin painting the tiles.
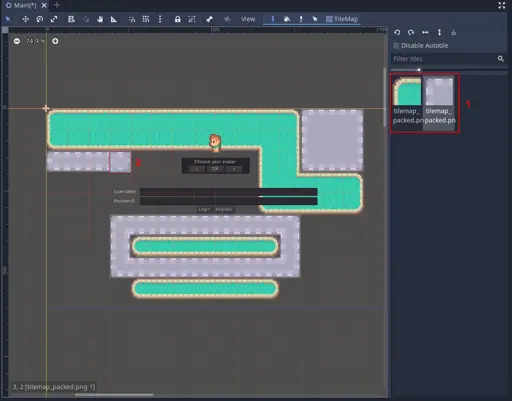
Create a design you are happy with, and save the project. Test it one last time to make sure you’re happy with it, because you are done!
Conclusion
If you made it to the end of this series, give yourself a pat on the back. Seriously! You now have the base to a fully extensible, robust, albeit simple MMO engine. At the moment, it can only be played over your local network, but for my first ad-hoc lesson, you guys voted to learn how to securely deploy it to play over the internet, from anywhere in the world! So stay tuned for that by subscribing to my YouTube channel or joining the Discord.
If you want to download the final, finished project, you can download the v1.0 release from the official GitHub repository.
Finally, I just wanted to say thank you so much for following along. This has been the biggest project I’ve undertaken so far and a lot of work has gone into this. If this series has helped you out and you would like to give something back to me feel free to buy me a coffee (or a beer) 🙂

Get in touch / connect with community
If you have any questions or feedback, I’d love to hear from you! Either drop a comment on the YouTube video, email me (my contact information is in the footer below), or join the Discord to chat with me and other students!