Securing and deploying our Godot Python MMO
Welcome to the first ad-hoc lesson continuing on from the core Godot Python MMO series. In this lesson we’ll be looking at how to secure and deploy our game to production so that anyone in the world can play it over the internet!
If you prefer, you can view this lesson on YouTube.
As always, you can visit the Releases section of the official GitHub repository, and download the End of lesson 5 code by expanding Assets and downloading Source code (zip). You can watch the video for this lesson on YouTube to see how to download this and set it all up.
Encryption at rest
As you may have noticed, our game is currently storing all of its data in plain text. This is fine for development, but it’s not a good idea to store passwords and other sensitive information in plain text in production. We can fix this by using a hashing algorithm to encrypt our passwords before we store them in the database.
Luckily, Django has a built-in authentication system that we can use to do this. We can replace our User model with the one that Django provides to store our user data, and it will automatically hash our passwords for us. We can then use the authenticate function to check if a user’s password is correct.
Firstly, we need to add the django.contrib.auth app to our INSTALLED_APPS in manage.py:
INSTALLED_APPS = [
    'server',
    'django.contrib.auth',
    'django.contrib.contenttypes'
]
Now, in models.py, we can replace our User model with the one that Django provides. So delete the User class in models.py, and at the top of the file, add the following:
from django.contrib.auth import models as auth_models
User = auth_models.User
This allows us to still reference our models.User class, but it is now instead pointing at the django.contrib.auth.models.User class, which automatically performs the hashing for us.
Come on in to protocol.py now, and let’s import the authenticate function from django.contrib.auth:
from django.contrib.auth import authenticate
We will be using this function to check if a user’s password is correct. We can now replace the LOGIN function in protocol.py with the following:
def LOGIN(self, sender: 'GameServerProtocol', p: packet.Packet):
    if p.action == packet.Action.Login:
        username, password = p.payloads

        user = authenticate(username=username, password=password)
        if user:
            self._actor = models.Actor.objects.get(user=user)

            self.send_client(packet.OkPacket())

            # Send full model data the first time we log in
            self.broadcast(packet.ModelDeltaPacket(models.create_dict(self._actor)))

            self._state = self.PLAY
        else:
            self.send_client(packet.DenyPacket("Username or password incorrect"))

    elif p.action == packet.Action.Register:
        username, password, avatar_id = p.payloads

        if not username or not password:
            self.send_client(packet.DenyPacket("Username or password must not be empty"))
            return

        if models.User.objects.filter(username=username).exists():
            self.send_client(packet.DenyPacket("This username is already taken"))
            return

        user = models.User.objects.create_user(username=username, password=password)
        user.save()
        player_entity = models.Entity(name=username)
        player_entity.save()
        player_ientity = models.InstancedEntity(entity=player_entity, x=0, y=0)
        player_ientity.save()
        player = models.Actor(instanced_entity=player_ientity, user=user, avatar_id=avatar_id)
        player.save()
        self.send_client(packet.OkPacket())
You’ll notice we slightly change the registration logic too, making sure we don’t allow empty usernames or passwords, and that we check if the username is already taken.
Because we have drastically changed the structure of our User model, we need to delete the database and create a new one. To do this, delete the db.sqlite3 file, and everything inside the migrations/ folder except __init__.py. Now we can create the database again by running a new initial migration:
python manage.py makemigrations
python manage.py migrate
Now, let’s test it out! If we run the server and register an account, we know the password will be stored securely in the database. If we then try to log in with the wrong password, we should get a “Username or password incorrect” error. We will also get an error if we try to register an account with an already taken username, or with an empty username or password. Using the correct combination of username and password should allow us to log in successfully, though!
Encryption in transit
Now that we have our passwords stored securely, we need to make sure that they are also encrypted in transit. This is so that if someone were to intercept our network traffic, they wouldn’t be able to see our passwords. We can do this by using TLS (Transport Layer Security) to encrypt our network traffic.
The websockets protocol supports TLS, but we need to make sure that our server is configured to use it. We can do this by including the twisted.internet.ssl module in protocol.py, so change our existing import to the following:
from twisted.internet import reactor, task, ssl
We will also replace the WebSocketServerFactory constructor call in our GameFactory class to use secure websockets (wss):
super().__init__(f"wss://{hostname}:{port}")
Finally, we need to update the if __name__ == "__main__": block in protocol.py to use TLS:
if __name__ == '__main__':
    log.startLogging(sys.stdout)

    certs_dir: str = f"{sys.path[0]}/certs/"
    contextFactory = ssl.DefaultOpenSSLContextFactory(certs_dir + "server.key", certs_dir + "server.crt")

    PORT: int = 8081
    factory = GameFactory('0.0.0.0', PORT)

    reactor.listenSSL(PORT, factory, contextFactory)
    reactor.run()
Notice we are expecting the server key and certificate to be in a certs/ folder in server/ directory. These files are used to encrypt and decrypt our network traffic. When we deploy our server, we will need to generate these files properly, but for now we can just generate some self-signed certificates. Also note that the server.key file should be kept secret, as it is used to decrypt the traffic and should only be used by the server.
Note that, in order to run our server with these new TLS settings, we need to install two new packages, so go ahead and install these now:
pip install pyOpenSSL
pip install service-identity
In order to continue testing our game locally, can generate some self-signed certificates using OpenSSL. If you don’t have OpenSSL installed, you can download it here. Once you have it installed, open a terminal and navigate to the certs/ folder. Then run the following commands:
openssl genrsa -out server.key 2048 # Generate a private key
openssl req -new -x509 -key server.key -out server.crt -days 3650 # Generate a self-signed certificate
The second command will ask you to fill in some information about the certificate. You can leave all the fields blank for now, except for the Common Name field, which you should set to localhost. This is just so that we can test our server locally without getting any certificate errors, but when we deploy our server we will need to do this step properly and use a real domain name.
Next, we need to update our client to use TLS. Open up websockets_client.gd and add the following line at the end of the _ready function:
_client.verify_ssl = false
This will ensure the client automatically trusts the certificate on the server, without needing to keep a copy for itself. This is probably not best-practice, but I wasn’t able to figure out how to get the client to trust only one expecting certificate, and still have the game work over an HTTPS-hosted HTML5 client. In short, I don’t see this being a huge deal as long as nobody tampers with your game files and replaces the server’s hostname with theirs. If someone had access to do this in the first place, then they would surely be able to swap out a trusted certificate anyway.
Finally, we need to change the connect_to_server function to use secure websockets (wss):
var websocket_url = "wss://%s:%d" % [hostname, port]
This is all we need to do on the client side! Now, if we run the server and client, we should be able to connect to the server over TLS. If you have the know-how, you can verify this by using a tool like Wireshark to inspect the network traffic.
Hosting your code on GitHub
Now that we have a working game, we should probably put it somewhere so that we can easily access it and pull in any updates. The most popular option for this is GitHub and it is what we will be using in this guide.
I won’t show you how to create a GitHub account, as I’m sure you can figure that out yourself, or you probably already have one. Once you have an account, you can create a new repository by clicking the Create repository button on the left-hand side of the homepage. You can name your repository whatever you want, but I will be using the name official-godot-python-mmo for the rest of this guide. Make sure to set the repository as public, so we can access it from anywhere. Then, click the “Create repository” button.
You will be presented with a quick setup guide, but just ignore that since we already have a project folder on our machine which we need to integrate manually with GitHub. For now, just copy the URL of your repository (it will be of the form https://github.com/your-username/your-repo), as we will need it later.
We will need to add a .gitignore file to our project folder so that we don’t accidentally commit any files we don’t want to (such as the certs/ folder). So create a new file called .gitignore in your project folder with the following contents:
server/__pycache__
server/venv
server/db.sqlite3
server/migrations
server/certs

# Godot-specific ignores
client/.import/
client/export.cfg
client/export_presets.cfg

# Imported translations (automatically generated from CSV files)
client/*.translation

# Mono-specific ignores
client/.mono/
client/data_*/

client/HTML5/
Now let’s get our project into GitHub. Open a terminal inside your project folder on your machine and run the following commands:
git init
git add .
git commit -m "Initial commit"
git branch -M main
git remote add origin https://github.com/your-username/your-repo
git push https://your-username@github.com/your-username/your-repo.git
Make sure to replace your-username and your-repo with the username and repository name you created earlier. A popup should appear asking you to enter your GitHub username and password, so go ahead and do that. If everything went well, you should be able to see your project on GitHub when you refresh the page.
A note on server hosting
Now that we have a working game, and our code is available online, we need to host the server somewhere so that other people can play it. There are a few options for hosting a server, but I found the cheapest option is to use Amazon Web Services (AWS). AWS is probably the biggest cloud-hosting service available, and as such, they have a huge selection of servers big and small.
For our needs, I will be showing you how to rent a small virtual machine on AWS which will be completely free for the first year. After the first year, you can switch to an even smaller server (t4g.nano, for reference) for about $5 USD per month, which is a lot cheaper than most other hosting options. Note that, even though the first year is free, you will still need to enter your credit card details to sign up. You would be hard-pressed to find a free hosting option that doesn’t require this.
I can only offer instructions for AWS, for otherwise I would have to write a guide for every hosting service available. If you are interested in hosting your server on a different service, or hosting from your own computer, I would recommend searching for a guide on how to do it (for the latter option, search “port forwarding”). If you can’t find one, then you can always join the Discord and ask for help.
Creating an AWS account
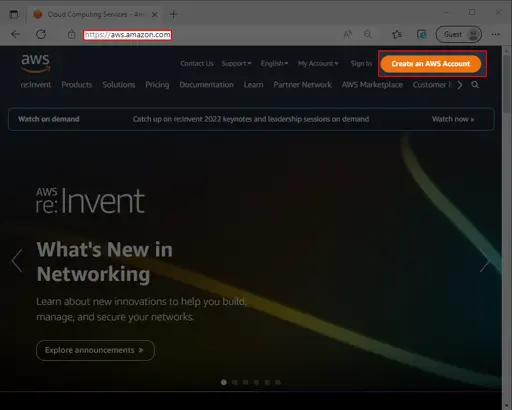
For those following along with AWS, the first thing we need to do is create an account. You can do this by going to https://aws.amazon.com/ and clicking the Create an AWS Account button.
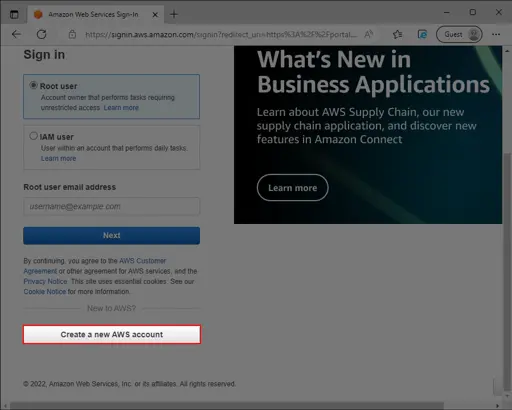
You will then be taken to a Sign in page, but you can ignore this and click the Create a new AWS account button at the bottom instead.
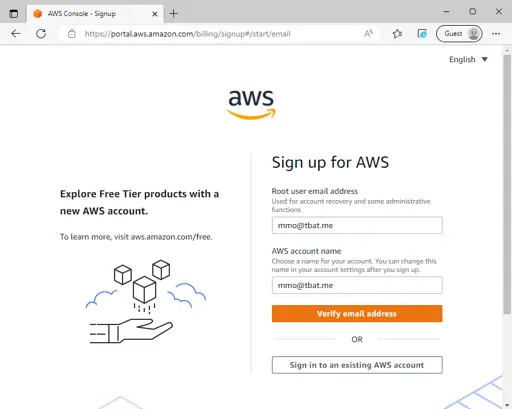
Here you will be asked a Root user email address and choose an AWS account name. You can enter whatever you want here, but I would recommend using your email address as the account name as this will make it easier to find your account later on. Then click the Verify email address button.
Now go to your inbox for the address you entered, and look for an email from no-reply@signup.aws called AWS Email Verification. Just copy the code from the email and enter it into the Verification code field on the AWS website, then click the Verify button.
Once you’ve verified your email address, you can choose a password for your account. Make sure you choose a strong password, and then click the Continue (step 1 of 5) button.
The next step is to enter your contact information. I would recommend choosing the Personal - for your own projects option here, as this should give you the most free services. Fill out the other information and click the Continue (step 2 of 5) button.
The next step is to enter your debit/bank/credit card details here. Note that AWS may charge $1 USD to your card to verify the card is active. Once you’ve filled out all the information, click the Continue (step 3 of 5) button.
The next step is to enter your mobile phone number which is needed to confirm your identity. The easiest option is to select Text message (SMS) and enter your mobile number, complete the security check, and click Send SMS (step 4 of 5).
Finally, you will be asked to choose a support plan. Just choose the Basic support - Free option here and click the Complete sign up button at the bottom of the page.
Now just click the button that says Go to the AWS Management Console. You will have to log in now with the details you just created, so enter your Root user email address and click Next to enter your password and click Sign in.
You will be redirected to the AWS Management Console where you can start creating your server. If you ever need to get back to this page, you can just go to https://console.aws.amazon.com/ and log in again.
Creating an AWS server
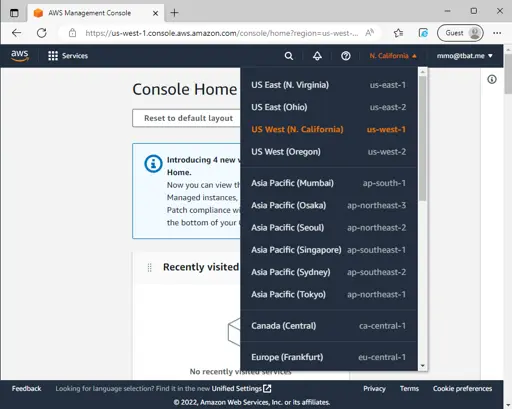
Now that we have an AWS account, we can create a server. First of all, however, we should make sure we are in the correct Region. The region is the location of the server, and you should choose the one that is closest to you or the people you anticipate will be playing your game. To change the region, click the dropdown in the top right corner of the page (it should have the name of a region written there) and select the region you want to use from the list. I will be using the US West (N. California) region for this guide, since that’s where most of you guys are from, apparently!
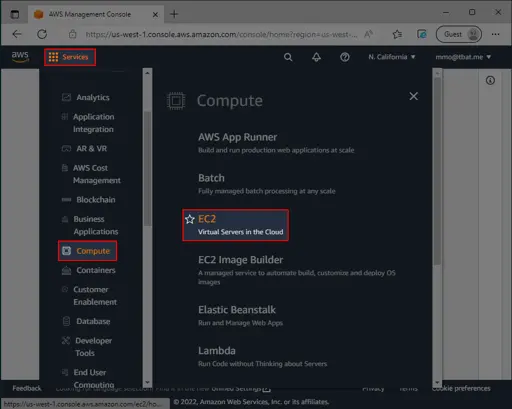
Next, head on over to the EC2 (Electronic Cloud Compute) service by clicking the Services dropdown in the top left corner of the page and selecting EC2 under Compute from the list.
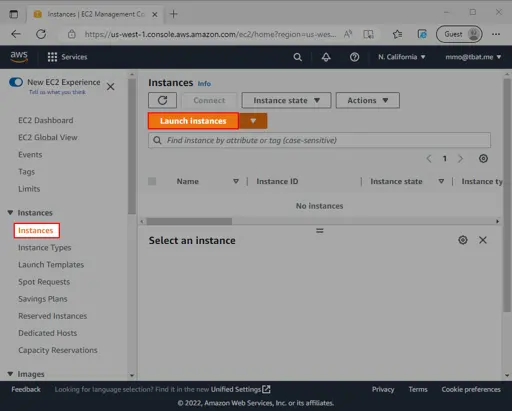
From here, you will want to click on Instances link in the left sidebar and click the orange Launch instances button at the top of the next page.
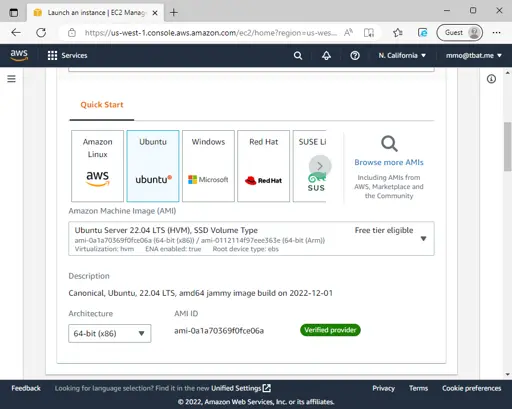
On the next page, we will choose all the information about our new server. Give your server any name you like in the Name field, then scroll down and select Ubuntu > under Quick Start. In the dropdown menu just below, choose the latest version of Ubuntu Server (22.04 at the time of this tutorial), ensuring it says Free tier eligible next to it. Ensure the architecture is 64-bit (x86).
Scroll down to the Instance type selection list, and choose the t2.micro option. This is the best server that is free to use for the first year (free tier eligible). If you want to use a larger instance type, you will have to pay for it, but since you’re just starting out, it would be smart to use the t2.micro instance for now.
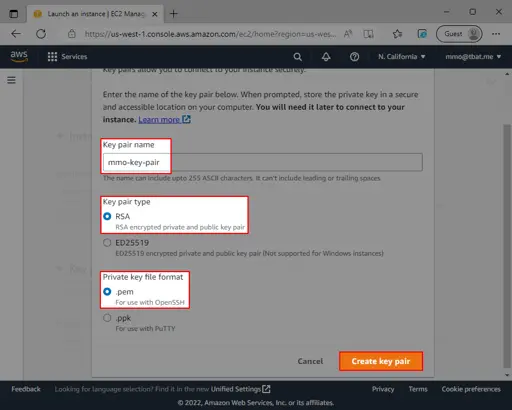
Scroll down to the Key pair (login) section. In order to access your server, you will need to generate a public-private key pair. Click the Create a new key pair button, enter a name for your key pair. Ensure RSA is selected as the type, and .pem is selected as the format. Now click the Create key pair button. This will download a file called to your computer. I would recommend saving this file to a folder in your home directory, ~/.ssh/ (you can create this folder if it doesn’t exist already). This is where you will store all your key pairs for accessing your servers. Keep this file safe as it is the only way to access your server. If you lose it, you will have to create a new key pair and update your server’s security group to allow access from your new key pair.
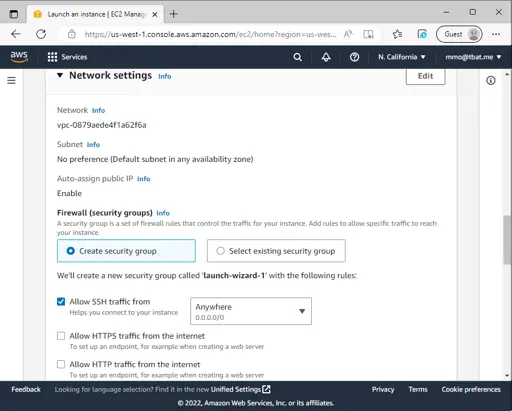
Now that you’ve created your key pair and selected it, scroll down to the Network settings section. Here, you will want to select Create security group under the Firewall section, and choose to Allow SSH traffic from Anywhere 0.0.0.0/0. This will allow you to access your server via SSH from your computer with your private key. You will see a warning about the security group being open to the world, but this is fine for us, since we will be keeping our private key secure.
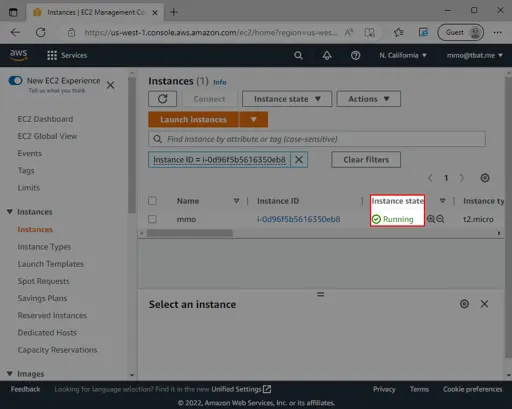
Leave everything else on this page as default (everything is reconfigurable later if you want), and click the Launch instance button at the bottom of the page. You’ll just have to wait a couple seconds before you are presented a link to your new instance. Click the link, or simply go back to Services > Compute > EC2 > Instances. You should see your new instance listed there. It will take a minute or so to fully up, and then you will see it say Running under the Instance state column.
Setting the security group
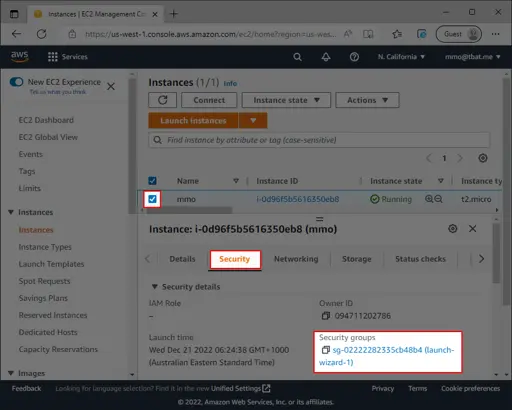
One last thing we need to do in AWS is to set the Security group settings for your new EC2 instance. Security groups are like firewalls, and they control what traffic is allowed to enter and leave your server. We need to make sure that our security group allows traffic on port 8081, or whichever port you choose to run your game under. To do this, ensure your instance is selected, and click on the Security tab in the bottom panel. Click on the link to the security group (it should be of the form sg-xxxxxxxx (launch-wizard-1)).
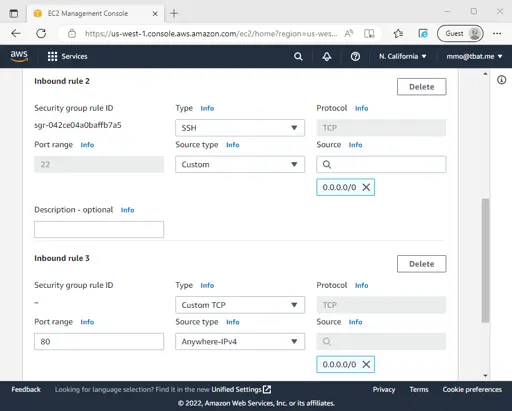
On the next page, ensure the Inbound rules tab is selected, and click the Edit inbound rules button.
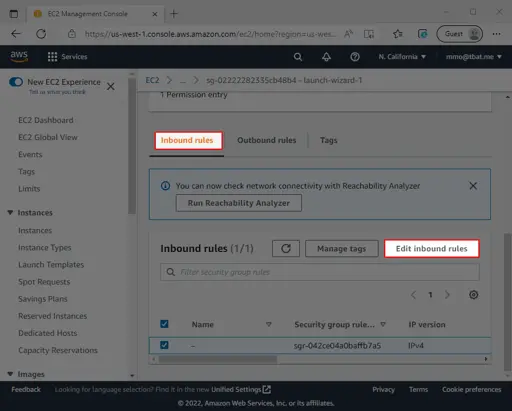
On the Edit inbound rules page, click the Add rule button, and select Custom TCP from the dropdown menu. In the Port range field, enter the port number you want to use for your game (8081 in my case). In the Source field, enter 0.0.0.0/0 which means anyone in the world can connect. Repeat this process for port 80 as well, as this will be needed later for provisioning TLS certificates on the server. Click the Save rules button.
Obtaining a domain name
Head back to the AWS console and click on Services > Compute > EC2 > Instances to get back to the instance you’ve created. Click on the Details tab, and you should see the Public IPv4 address of your server. Take note of this IP address, as we will need it later.
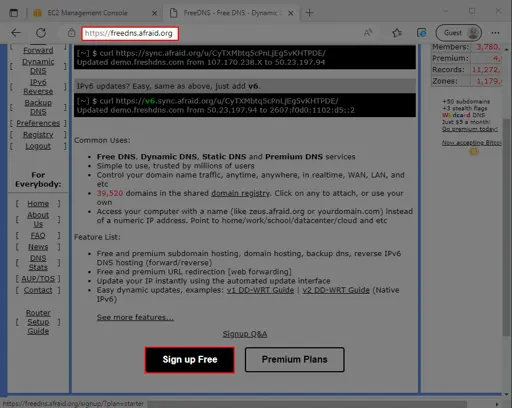
To keep the costs as low as possible, we will be using a free domain service called FreeDNS. This service allows you to register a subdomain for free, and point it to your server’s IP address. To do this, head to https://freedns.afraid.org/, and click the Sign up Free button at the bottom.
Enter your details here, enter the verification code, check the T&Cs, and click the Send activation email button. I would recommend keeping the E-Mail address field the same as the email you used to sign up with AWS, so everything is easy to find later. Once you’ve done this, you should receive an email from dnsadmin@afraid.org with a link to activate your account (it may take a minute to come through, and make sure you check your spam folder too). Click the link, and you should be taken to the subdomains page.
Ignore this page for now, and just click on the Registry link on the left-hand side under For Members.

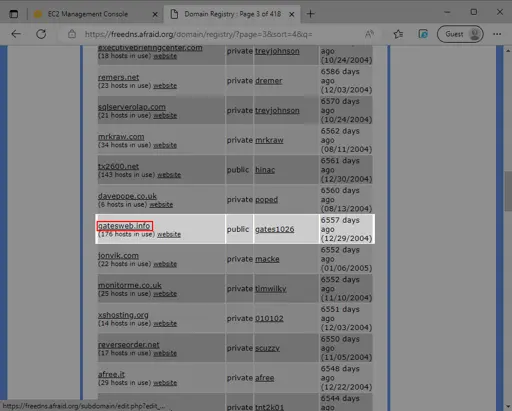
From this list, there will be lots of domains to choose from. Firstly, let’s click on the Age column to sort by oldest domains first, as these will be the least likely to disappear any time soon. It may be tempting to choose something cool from the first page, but I would recommend choosing something that is on the third page or after, as it won’t be as used. This ensures later, when we want to register a free a TLS certificate, we won’t run into any problems with too many people requesting certificates for that domain.
So scroll down and go to page 3 or 4, and choose a public domain that doesn’t have too many hosts using it (e.g., I chose a domain registered in 2004 which only has 176 hosts registered to it).
Just click on the link of the domain you want to use, ensuring it says public.
You will be taken to the Add a new subdomain page where you can now enter the IP address of your AWS EC2 instance you noted down earlier. Ensure the Type is set to A, and enter something unique in the Subdomain field. For example, if you enter “mydomain”, and you chose a domain before called “gatesweb.info” your game’s hostname will be “mydomain.gatesweb.info”. Finally, enter the IP address of your EC2 instance in the Destination field. Fill out the verification image, leave everything else along, and click the Add button.
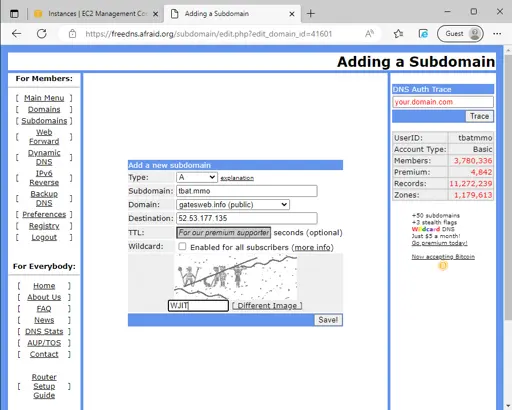
If you got the verification image correctly (these ones are tricky), you should see your new subdomain appear. You have now successfully registered a domain name for your game!
We are done with FreeDNS for now, but remember you need to come back to this site every 6 months. Otherwise, your account will be considered dormant and deregistered (your domains too). Since this is a free service, it’s to be expected. Make sure you set a reminder to log in every few months to avoid this!
Configuring the server
Let’s log in to our server. If you know how to use SSH to access the server from your terminal, go ahead. I will be showing how to do this all within the AWS console.
Go back to the AWS console, and click on Services > Compute > EC2 > Instances and select your instance. Now click on the Connect button at the top.

Ensure the User name is ubuntu and scroll down and click Connect. A new tab will be open where you will be loaded into a virtual terminal.
Now we’re going to enter some commands to get everything up to date. You can copy and paste these commands one-by-one and press enter after each one (press y to confirm if prompted).
sudo apt update
sudo apt upgrade
sudo snap install core
sudo snap refresh core
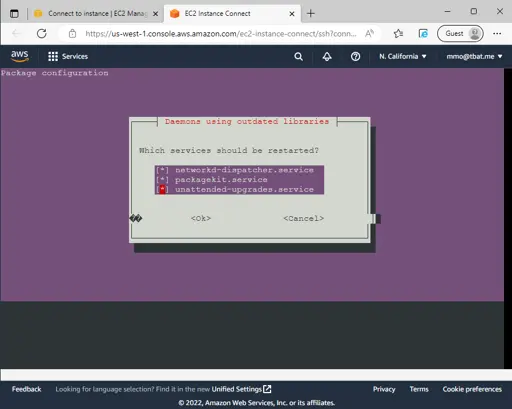
The second command might ask you to restart some services. Just select all of them by using the up and down arrow keys and the space bar. Then press enter to confirm.
After that’s all done, we need to ensure the firewall lets ports 22 (for SSH), 8081 (or the port your game is running), and 80 through. To do this, enter the following command:
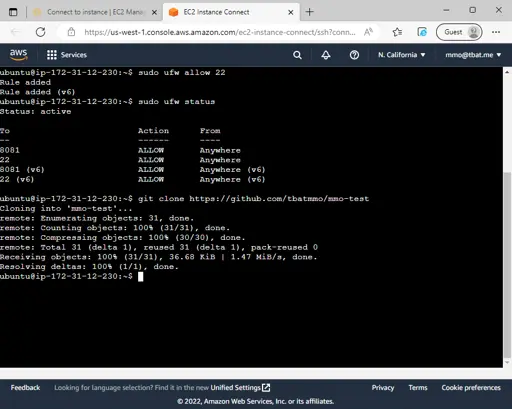
sudo ufw allow 22
sudo ufw allow 8081
sudo ufw allow 80
The firewall is disabled by default anyway, which is fine since we are using an AWS security group. If you want to turn it on anyway, you can do so by entering the following command and pressing y to confirm:
sudo ufw enable
Running our game on the server
Now we can go ahead and download the code for our game. Because our code is on GitHub, we can easily clone it from the server. To do this, enter the following command:
git clone https://github.com/your-username/your-repo
Make sure to replace your-username and your-repo with the username and repository name for the GitHub repository you created earlier.
Now let’s set up our server from scratch and try to run it! These commands will create the required server/migrations/__init__.py (just replace your-repo with the name of your GitHub repository):
cd your-repo/server
mkdir migrations
touch migrations/__init__.py
Next, let’s install the Ubuntu package required to set up our virtual environment:
sudo apt install python3-venv
Now let’s install the virtual environment and all the required packages (make sure to include pyOpenSSL and service-identity for the TLS stuff):
python3 -m venv ./venv
source ./venv/bin/activate
pip install autobahn[twisted]
pip install django
pip install pyOpenSSL
pip install service-identity
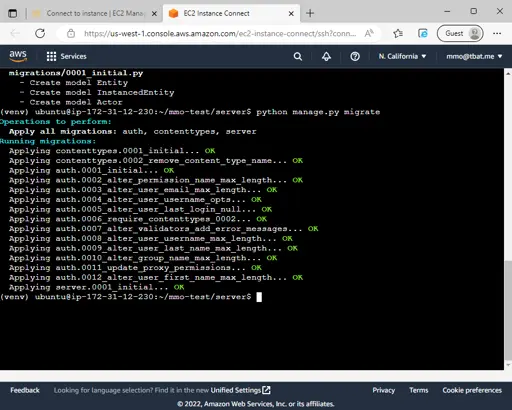
python manage.py makemigrations
python manage.py migrate
We need to generate the certificates required to run the server now. For this, we will use Let’s Encrypt. Let’s Encrypt is a free certificate authority which can automatically provision certificates on our server for our game to use. To set this up, we need to create our server/certs/ folder, move into it, install the certbot package, make some certificates, and copy them in:
mkdir certs
cd certs
sudo snap install --classic certbot
sudo ln -s /snap/bin/certbot /usr/bin/certbot
sudo certbot certonly --standalone
At this stage, you will be asked to answer some questions. Importantly, when asked for a common name, enter the domain name you registered on FreeDNS earlier. If you don’t enter the correct domain name, you will get an error.
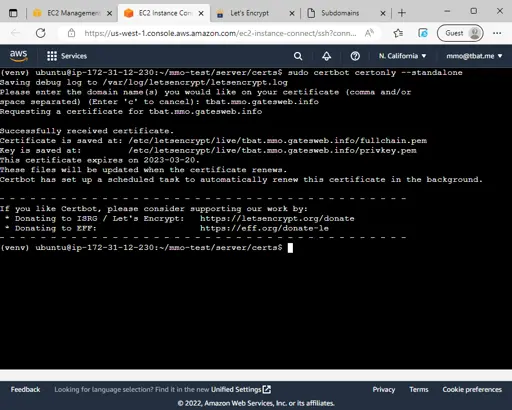
Now you will get a public certificate and private key in the /etc/letsencrypt/live/your-domain/ folder. We need to copy these into the server/certs/ folder we created earlier. To do this, enter the following commands (just be sure to replace your-domain with your subdomain you registered and entered just before):
sudo cp /etc/letsencrypt/live/your-domain/fullchain.pem ./server.crt
sudo cp /etc/letsencrypt/live/your-domain/privkey.pem ./server.key
We need to change the permissions on these files so our server can use them:
sudo chown $USER *
Now we can move back out into the server/ folder and try running it!
cd ..
python .
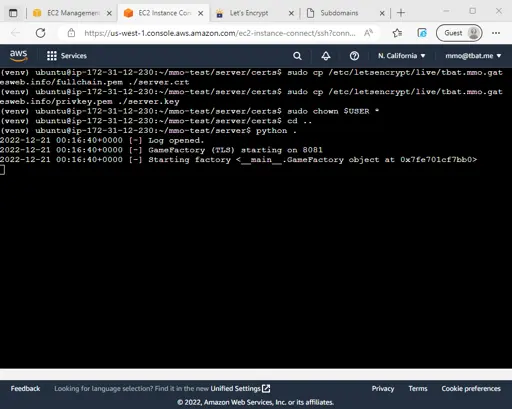
If you see the above output, then your server is running! You can now connect to it from your game client, if you just change the hostname line in the _ready function of Main.gd first. Go ahead and give it a go, both on the desktop and HTML5 versions of your game! You should see the server output in your AWS EC2 terminal tab, confirming you are indeed connecting to the server over the internet!
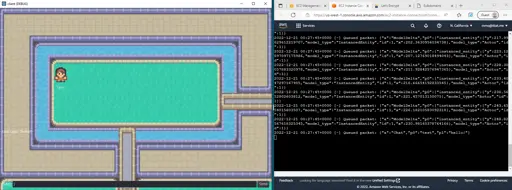
If you get any errors at this point, or don’t see any output in your AWS EC2 terminal, there could be many reasons. If you see no output in your server terminal, double check you have allowed port 8081 through the security group settings, and you ran sudo ufw allow 8081. If you are getting a specific error, try Googling it for clues and carefully read over this guide again. If you are still stuck, feel free to join the Discord and ask for help!
Keeping the server certificates renewed
Let’s Encrypt certificates expire after just 90 days, and it can be a hassle to need to renew them every time before they expire. To make our lives easier, we will set up a recurring job to renew the certificate, copy them into our server/certs/ directory, and change the ownership for us. To do this, we will need to get our hands dirty writing a bash script and setting up a cron job.
Here’s the script, which you should put in the Ubuntu server’s /bin/ directory. So go ahead and type sudo nano /bin/copy-certs.sh and paste the following code into the script:
#!/bin/sh

set -e

if [ "$(id -u)" -ne 0 ]; then
    echo "$(date) Please run this script as root."
    exit 1
fi

if [ "$#" -ne 2 ]; then
    echo "$(date) Must supply a project directory and a user who is running the game server."
    echo "$(date) If you are unsure which arguments to choose, cd into your project directory and run \"\$(pwd) \$USER\""
    exit 1
fi

project_dir="$1"
server_usr="$2"

if [ ! -d "$project_dir" ]; then
    echo "$(date) Project directory $project_dir does not exist. Check you spelled it correctly and you've cloned your project into the correct location."
    exit 1
fi

server_dir="$project_dir/server"
if [ ! -d "$project_dir" ]; then
    echo "$(date) Project directory exists, but could not find server folder ($server_dir). Check you cloned the repository correctly and haven't accidentally moved or deleted something."
    exit 1
fi

# Run the Let's Encrypt renewals if they're up for renewal
echo "$(date) Attempting to renew Let's Encrypt certificates..."
certbot renew

# Copy the renewed certificates into the game server directory
certs_dir="$server_dir/certs"
if [ ! -d "$certs_dir" ]; then
    echo "$(date) Certificates folder not found. Automatically creating $certs_dir..."
    mkdir "$certs_dir"
    chown "$server_usr" "$certs_dir"
fi

echo "$(date) Attempting to copy Let's Encrypt certificates to $certs_dir"
cp /etc/letsencrypt/live/*/fullchain.pem "$certs_dir/server.crt"
cp /etc/letsencrypt/live/*/privkey.pem "$certs_dir/server.key"
echo "$(date) Done"

echo "$(date) Attempting to change ownership of $certs_dir/server.crt and $certs_dir/server.key to $server_usr"
chown "$server_usr" "$certs_dir/server.crt"
chown "$server_usr" "$certs_dir/server.key"
echo "$(date) Done"

exit 0
Save the script by pressing Ctrl+X, then Y, then Enter.
Now we need to make the script executable:
sudo chmod +x /bin/copy-certs.sh
Finally, move back out into your main project folder:
cd ..
If you run pwd, you should see something like /home/ubuntu/repo-name.
Now run the following piece of code:
echo "0 0 * * * /bin/copy-certs.sh $(pwd) $USER"
The output should look something like this (if not exactly like this)
0 0 * * * /bin/copy-certs.sh /home/ubuntu/repo-name ubuntu
The output of this command is the cron job we need to set up. Copy the output of the command and then run sudo crontab -e to open the cronjob editor. Paste the output of the command in a new line at the bottom of the file, and save it (Ctrl+X, then Y, then Enter if you’re using nano).
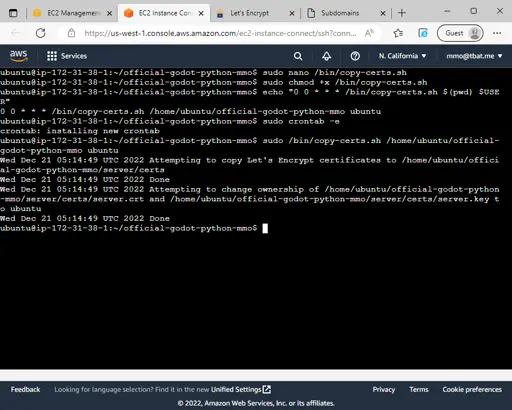
This is telling the server to run our script every day at midnight, which will renew the certificates if they’re up for renewal, and copy them into our game server directory. You should test it out by manually running the latter half of the output of the command we ran earlier as the root user (using the sudo command). Overall, you should try running something like this:
sudo /bin/copy-certs.sh /home/ubuntu/repo-name ubuntu
If you see something like this, everything should be good to go:
Wed Dec 21 05:11:15 UTC 2022 Attempting to copy Let's Encrypt certificates to /home/ubuntu/official-godot-python-mmo/server/certs
Wed Dec 21 05:11:15 UTC 2022 Done
Wed Dec 21 05:11:15 UTC 2022 Attempting to change ownership of /home/ubuntu/official-godot-python-mmo/server/certs/server.crt and /home/ubuntu/official-godot-python-mmo/server/certs/server.key to ubuntu
Wed Dec 21 05:11:15 UTC 2022 Done
Client hosting
Now we’re ready to save our client files and distribute them to our users. I think the best way to do this is via itch.io. Itch.io is a great platform for distributing games, and it’s free to use.
To get started, we need to do a final HTML5 export of our game, making sure we saved Main.gd after changing the hostname to the domain name we registered earlier. When you export, remember to check the experimental keyboard option (as discussed in lesson 4) and save it as index.html in the client/HTML5 folder.
Now, zip up your client/HTML5 folder so we can upload it to itch.io. Once you’ve done this, go to itch.io and register a free account. Once you’ve registered check your email inbox to confirm your address (you can’t upload your game until you’ve done this).
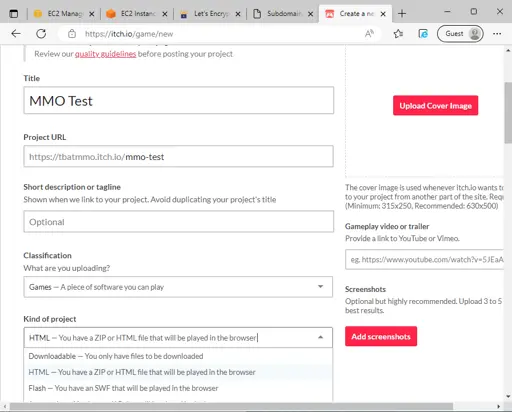
Once your address is confirmed, go back to itch.io and click the dropdown list at the top-right and select Upload new project. Give your project a name, URL, and under Kind of project, be sure to select HTML.
Scroll down to the Uploads section, and click on the red Upload files button. Here, navigate to your HTML5 zip archive you made, and open it to begin uploading.
Now, you are free to tweak all the other fields on this page to your liking. Remember you can always come back and edit these later. Once you’re happy, click the Save & view page button at the bottom of the page. You should now see your game listed on your itch.io profile page!
Try clicking the Run game button to see if it works!
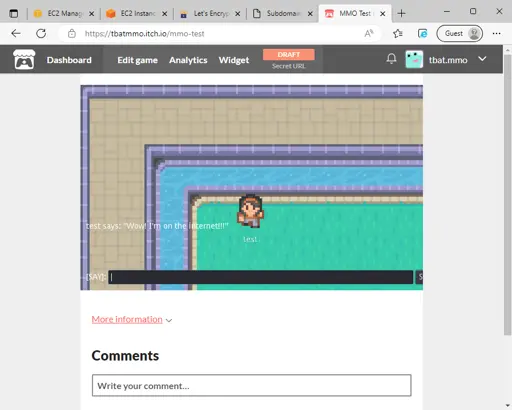
Hopefully it’s all working at this point! Now, you will want to click the Edit game tab up the top so you can go back and tweak a couple of things (notably the Embed options width/height). Once you’re happy, scroll to the bottom and click Public under Visibility & access and hit Save. Now, your game is live and ready to be played by anyone!
Be sure to share the link with your friends and family, and get them to test for you as well! If you made it this far, be sure to give yourself a pat on the back, you’ve done a great job!
Make sure your server is always running
One more thing before we close off. If you close your AWS tab, your server will stop running. This is because we are running it in the foreground, and when you close the tab, the server stops. We need to run it in the background so it keeps running even when we close the tab.
To do this, we will use the tmux utility which is already installed on Ubuntu by default. Press CTRL+C in your AWS EC2 terminal to stop the server, and then enter the following command:
tmux new-session -d -s gameserver \; send-keys "python ." Enter
You are now free to close your AWS EC2 tab, and your server will keep running in the background. You can check this by logging back into your AWS EC2 instance and running the following command:
tmux attach -t gameserver
To get out of the tmux session, press CTRL+B and then D. You should now be back in your AWS EC2 terminal. If you want to stop the server, you can run the following command:
tmux kill-session -t gameserver
These commands are very useful, and you will probably use them all the time.
Finally, if you need to make any changes to your server, the process to update the game is to:
- Make changes to your server code
- Push the changes to your GitHub repository (you can find many guides online for this)
- Connect to your AWS EC2 instance via the AWS console or SSH
- Stop the server with
tmux kill-session -t gameserver - Move into the game directory with
cd ~/your-repo(replaceyour-repowith the name of your GitHub repository) - Pull in the latest changes with
git pull - Make sure your virtual environment is activated with
source venv/bin/activate - Run any database migrations that may be needed with
python manage.py makemigrationsandpython manage.py migrate - Start the server again with
tmux new-session -d -s gameserver \; send-keys "python ." Enter - Close the AWS EC2 session and re-export/re-upload your client files to itch.io if needed.
This whole process can be automated, but I won’t go into that here. That’s a completely different topic called Continuous Integration/Continuous Deployment (CI/CD). It is a very useful topic, and can be achieved for free using GitHub Actions. Let me know if you would like me to cover this in a future lesson!
Conclusion
Wow! We’ve made it to the end of this huge topic. I hope were able to follow along, and I hope you have a lot of fun playing your game with your friends and family! If you want to show off your game, feel free to share it in the Discord! As always, thanks for following along!
Get in touch / connect with community
If you have any questions or feedback, I’d love to hear from you! Either drop a comment on the YouTube video, email me (my contact information is in the footer below), or join the Discord to chat with me and other students!
If this series has helped you out and you would like to give something back to me feel free to buy me a coffee (or a beer) 🙂
